> ## Documentation Index
> Fetch the complete documentation index at: https://docs.withrealm.com/llms.txt
> Use this file to discover all available pages before exploring further.
# Users
> Manage users, roles, and provisioning in your Realm organization
The Users page lets you manage who has access to your Realm workspace. Navigate to **Settings** > **Users** in the sidebar.
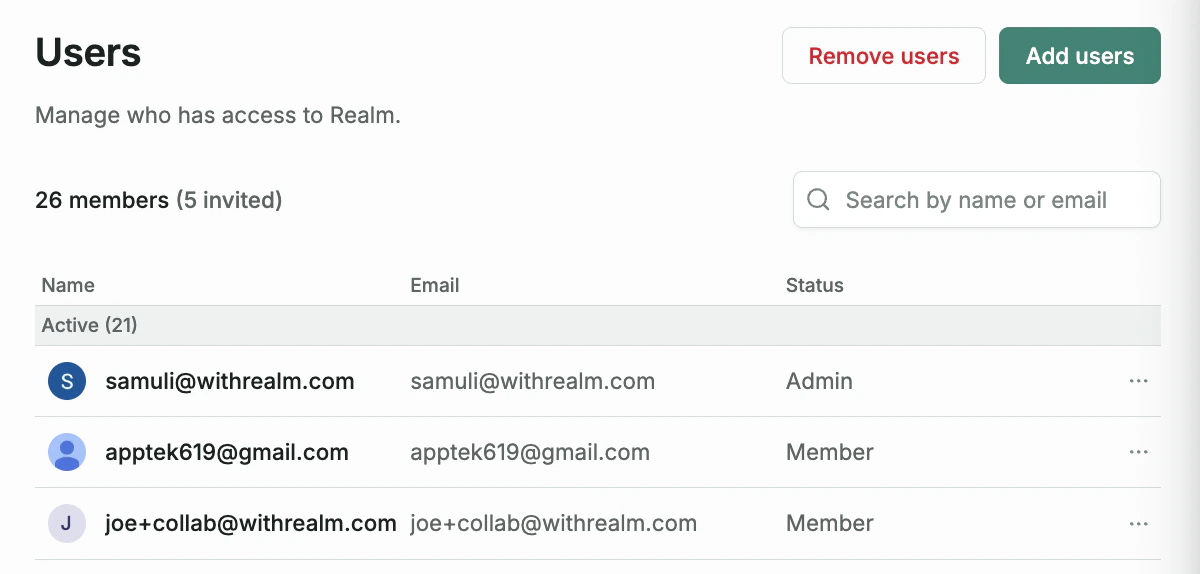 The page shows your total user count and how many are invited. Use the search bar to find users by name or email. Users are split into **Active** and **Invited** sections, each showing the user's name, email, and status.
For eligible workspaces that are not on usage-based billing, active users also have a **Daily automation** column. It shows the percentage remaining in each user's shared API chat and workflow allowance. The allowance resets each day at 00:00 UTC.
## Adding users
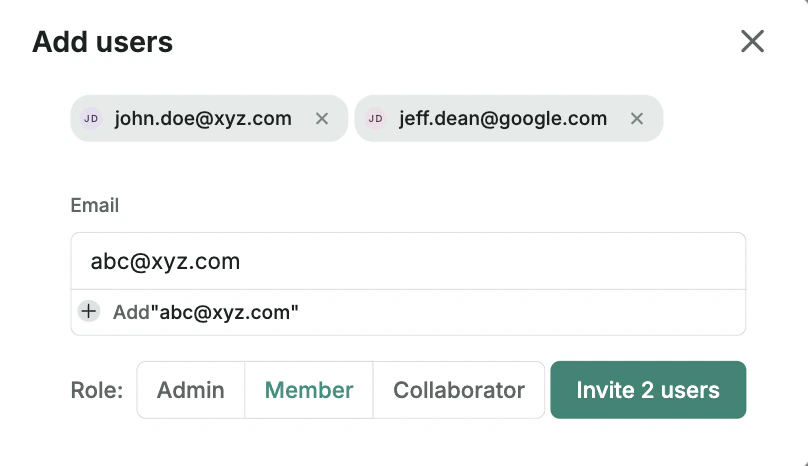
Click **Add users** in the top right corner of the Users page.
Type or paste one or more email addresses, separated by spaces, commas, or
newlines. You can copy a column of emails from a spreadsheet and paste it
directly into the field. The dialog shows whether any emails are already
invited or have existing accounts.
Select **Admin**, **Member**, or **Collaborator** for the invited users.
Click **Invite**. Users receive an email with a link to join your workspace.
The page shows your total user count and how many are invited. Use the search bar to find users by name or email. Users are split into **Active** and **Invited** sections, each showing the user's name, email, and status.
For eligible workspaces that are not on usage-based billing, active users also have a **Daily automation** column. It shows the percentage remaining in each user's shared API chat and workflow allowance. The allowance resets each day at 00:00 UTC.
## Adding users
Click **Add users** in the top right corner of the Users page.
Type or paste one or more email addresses, separated by spaces, commas, or
newlines. You can copy a column of emails from a spreadsheet and paste it
directly into the field. The dialog shows whether any emails are already
invited or have existing accounts.
Select **Admin**, **Member**, or **Collaborator** for the invited users.
Click **Invite**. Users receive an email with a link to join your workspace.
 ## Roles
Realm has three roles:
| Role | Description |
| ---------------- | -------------------------------------------------------------------------------------------------- |
| **Admin** | Full control of the organization. Can manage users, data sources, tools, agents, and all settings. |
| **Full Member** | Full access to Realm features (chat, search, agents, tools). Cannot access admin settings. |
| **Collaborator** | Limited access. Can edit RFPs, search, and use Realm Chat (capped usage). |
### Changing a user's role
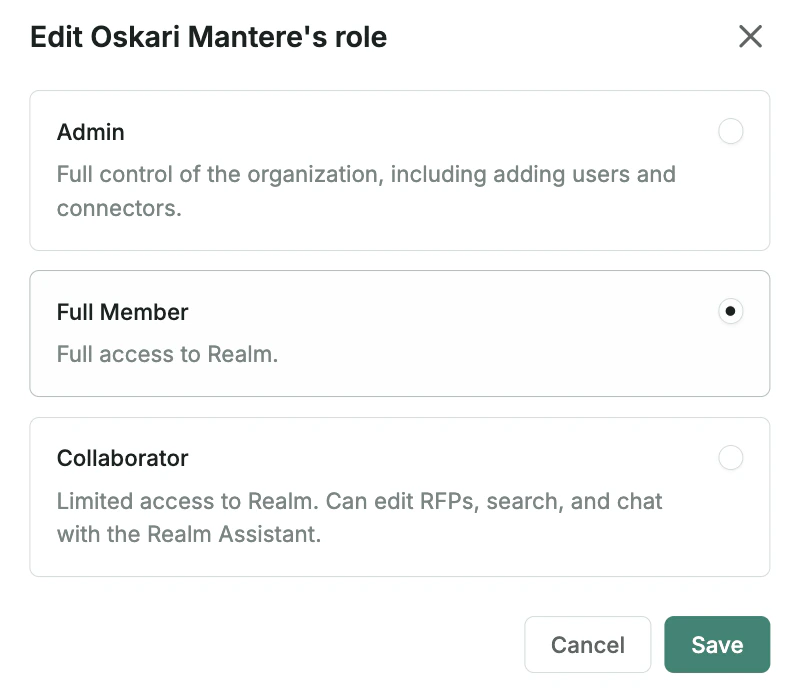
Click the three-dot menu next to a user and select **Edit role**. Choose the new role and click **Save**.
## Roles
Realm has three roles:
| Role | Description |
| ---------------- | -------------------------------------------------------------------------------------------------- |
| **Admin** | Full control of the organization. Can manage users, data sources, tools, agents, and all settings. |
| **Full Member** | Full access to Realm features (chat, search, agents, tools). Cannot access admin settings. |
| **Collaborator** | Limited access. Can edit RFPs, search, and use Realm Chat (capped usage). |
### Changing a user's role
Click the three-dot menu next to a user and select **Edit role**. Choose the new role and click **Save**.
 ## Removing users
Click **Remove users** in the top right, enter the email addresses you want to remove, then confirm. Like the add dialog, you can paste a comma- or space-separated list of emails. You can remove both active users and pending invitations.
When removing users in bulk, all of their agents, projects, and tables are
transferred to the admin who removed them. To choose a different recipient,
remove the user individually with the **Remove user** action below.
## Managing users
Click the three-dot menu next to any user to see available actions:
| Action | Description |
| ------------------------------- | ----------------------------------------------------------------------------------------------------------------------------------- |
| **Edit role** | Change the user's role (Admin, Full Member, or Collaborator) |
| **Resend invitation email** | Re-send the invite to an invited user |
| **Remove user** | Revoke access and remove the user. You can choose which active member inherits their agents, projects, and tables (defaults to you) |
| **Force sign out** | End all sessions for an active user across all devices |
| **Move assistants to yourself** | Transfer the user's personal assistants to your account |
## Seat limits
Your organization has a fixed number of seats. When the limit is reached, the **Add users** button is disabled with a "User limit reached" tooltip. You cannot invite new users until a seat is freed.
Need more seats? Contact [support@withrealm.com](mailto:support@withrealm.com) to increase your organization's
seat limit.
## Just-in-time (JIT) provisioning
With JIT provisioning, users are automatically created in Realm the first time they sign in, with no invite needed. This is useful with SSO, where new employees can start using Realm immediately after signing in with their company credentials.
JIT provisioning is scoped to specific email domains (e.g. `@company.com`). Only users whose email matches a configured domain are auto-provisioned. You can also configure which role JIT-provisioned users receive (Admin, Full Member, or Collaborator). The default role is Full Member.
JIT provisioning is configured by the Realm team on behalf of your
organization. Contact [support@withrealm.com](mailto:support@withrealm.com) to enable it or to update the
allowed domains and default role.
## Removing users
Click **Remove users** in the top right, enter the email addresses you want to remove, then confirm. Like the add dialog, you can paste a comma- or space-separated list of emails. You can remove both active users and pending invitations.
When removing users in bulk, all of their agents, projects, and tables are
transferred to the admin who removed them. To choose a different recipient,
remove the user individually with the **Remove user** action below.
## Managing users
Click the three-dot menu next to any user to see available actions:
| Action | Description |
| ------------------------------- | ----------------------------------------------------------------------------------------------------------------------------------- |
| **Edit role** | Change the user's role (Admin, Full Member, or Collaborator) |
| **Resend invitation email** | Re-send the invite to an invited user |
| **Remove user** | Revoke access and remove the user. You can choose which active member inherits their agents, projects, and tables (defaults to you) |
| **Force sign out** | End all sessions for an active user across all devices |
| **Move assistants to yourself** | Transfer the user's personal assistants to your account |
## Seat limits
Your organization has a fixed number of seats. When the limit is reached, the **Add users** button is disabled with a "User limit reached" tooltip. You cannot invite new users until a seat is freed.
Need more seats? Contact [support@withrealm.com](mailto:support@withrealm.com) to increase your organization's
seat limit.
## Just-in-time (JIT) provisioning
With JIT provisioning, users are automatically created in Realm the first time they sign in, with no invite needed. This is useful with SSO, where new employees can start using Realm immediately after signing in with their company credentials.
JIT provisioning is scoped to specific email domains (e.g. `@company.com`). Only users whose email matches a configured domain are auto-provisioned. You can also configure which role JIT-provisioned users receive (Admin, Full Member, or Collaborator). The default role is Full Member.
JIT provisioning is configured by the Realm team on behalf of your
organization. Contact [support@withrealm.com](mailto:support@withrealm.com) to enable it or to update the
allowed domains and default role.