> ## Documentation Index
> Fetch the complete documentation index at: https://docs.withrealm.com/llms.txt
> Use this file to discover all available pages before exploring further.
# Tools
> Connect external tools so your agents can take actions
Tools let agents take actions in external systems. Send emails, update CRMs, create tickets, post messages, and more.
**Tools vs Data sources:** Data sources sync knowledge *into* Realm so agents
can search and reference it. Tools let agents act *outward* by performing
actions in external systems.
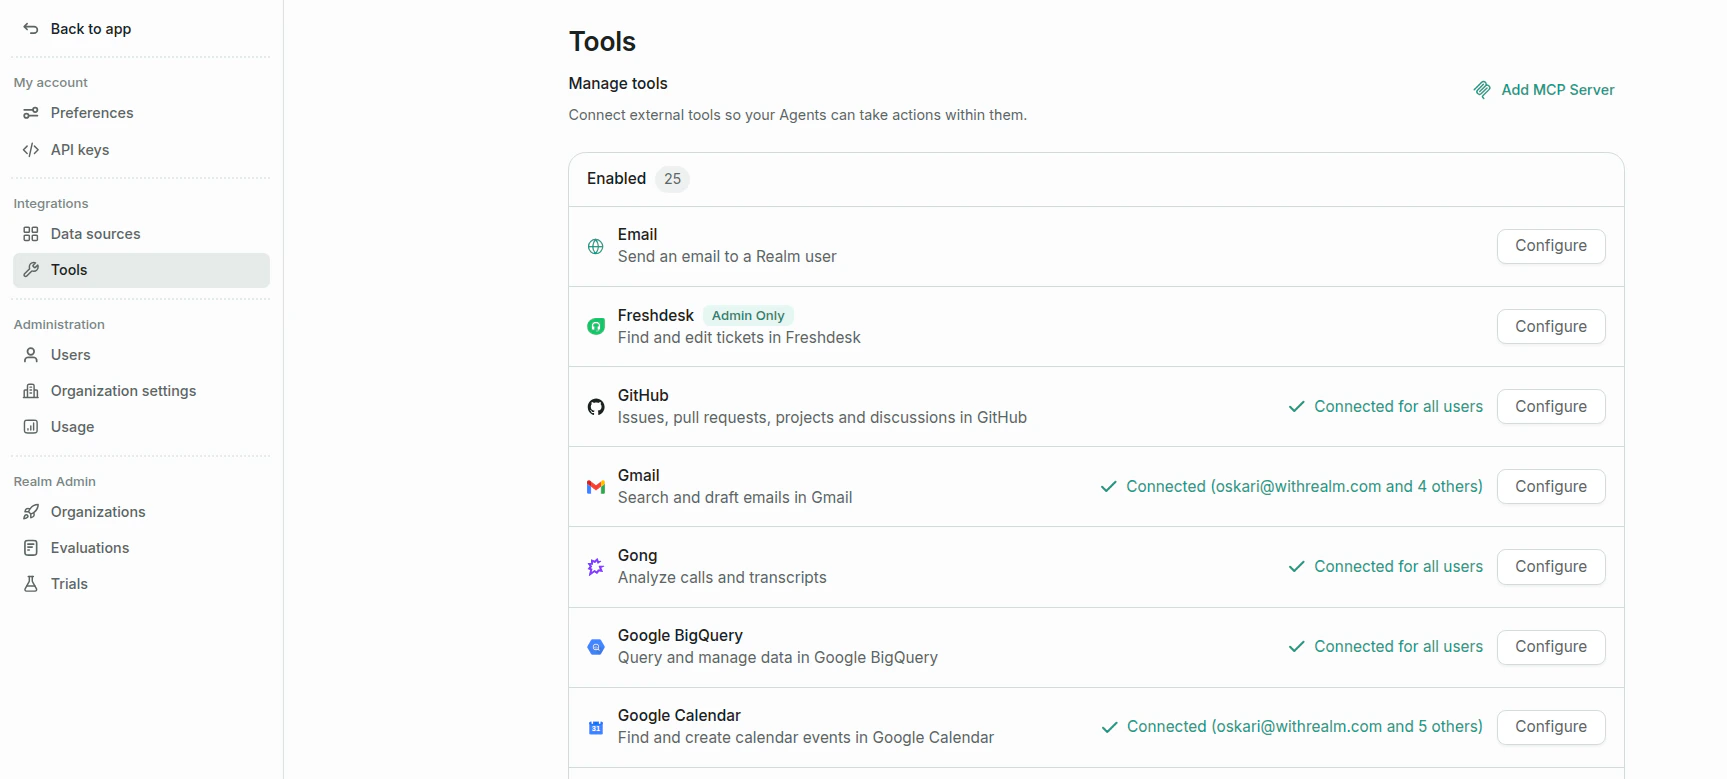
To manage tools, go to **Agents** > **Tools** or **Settings** > **Tools** in the sidebar.
 ## Available tools
Realm includes tools for popular workplace apps:
### Built-in tools
Two tools are available out of the box with no setup required:
| Tool | Description |
| ---------------- | ---------------------------------------------------------------------------------------------------------------------------------- |
| **Email** | Send emails to Realm users |
| **HTTP Request** | Send HTTP requests to external APIs and webhooks. Target APIs may still require their own authentication (e.g. headers or tokens). |
### Connection scope
Each tool uses one of two connection scopes. For organization-scoped tools, everyone in the workspace uses the same connection with the same permissions as whoever authenticated the tool. If you want specific access rights, you can create a dedicated account for Realm.
| Scope | Description |
| ---------------- | ------------------------------------------------------------------------------------------------------------------------- |
| **Organization** | A single shared connection used by everyone in the workspace. An admin authenticates once and all users can use the tool. |
| **Personal** | Each user connects their own account. Actions are performed on behalf of the individual user. |
Some tools support only one scope. **Gmail**, **Google Calendar**, and
**Outlook** are personal-only (each user connects their own account).
**Slack** and **Vitally** are organization-only (one shared connection for the
whole workspace).
## Enabling a Tool
Go to **Agents** > **Tools** or **Settings** > **Tools** in the sidebar.
Browse the **Available** section for the tool you want to enable.
## Available tools
Realm includes tools for popular workplace apps:
### Built-in tools
Two tools are available out of the box with no setup required:
| Tool | Description |
| ---------------- | ---------------------------------------------------------------------------------------------------------------------------------- |
| **Email** | Send emails to Realm users |
| **HTTP Request** | Send HTTP requests to external APIs and webhooks. Target APIs may still require their own authentication (e.g. headers or tokens). |
### Connection scope
Each tool uses one of two connection scopes. For organization-scoped tools, everyone in the workspace uses the same connection with the same permissions as whoever authenticated the tool. If you want specific access rights, you can create a dedicated account for Realm.
| Scope | Description |
| ---------------- | ------------------------------------------------------------------------------------------------------------------------- |
| **Organization** | A single shared connection used by everyone in the workspace. An admin authenticates once and all users can use the tool. |
| **Personal** | Each user connects their own account. Actions are performed on behalf of the individual user. |
Some tools support only one scope. **Gmail**, **Google Calendar**, and
**Outlook** are personal-only (each user connects their own account).
**Slack** and **Vitally** are organization-only (one shared connection for the
whole workspace).
## Enabling a Tool
Go to **Agents** > **Tools** or **Settings** > **Tools** in the sidebar.
Browse the **Available** section for the tool you want to enable.
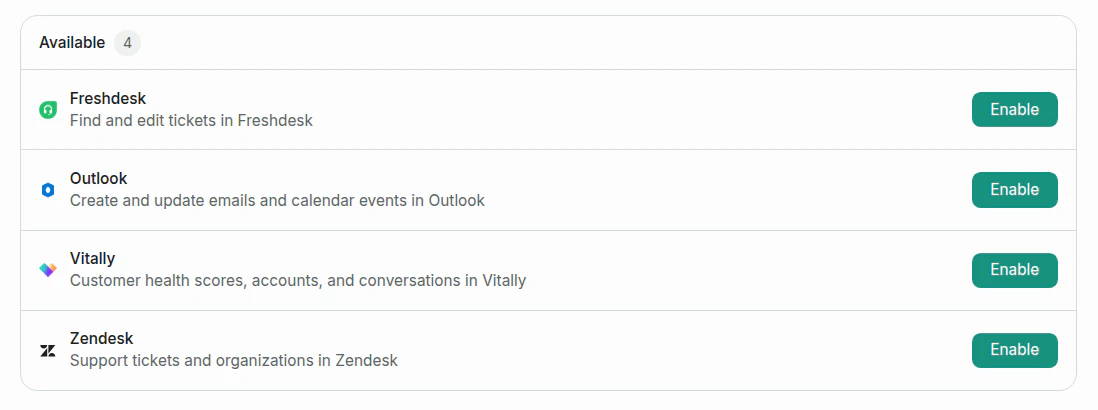 Click **Configure** or **Enable** on the tool.
Select **Organization** or **Personal** as the connection scope. Some tools support only one scope, so the selector is hidden. Gmail, Google Calendar, and Outlook are personal-only. Slack and Vitally are organization-only.
Click **Configure** or **Enable** on the tool.
Select **Organization** or **Personal** as the connection scope. Some tools support only one scope, so the selector is hidden. Gmail, Google Calendar, and Outlook are personal-only. Slack and Vitally are organization-only.
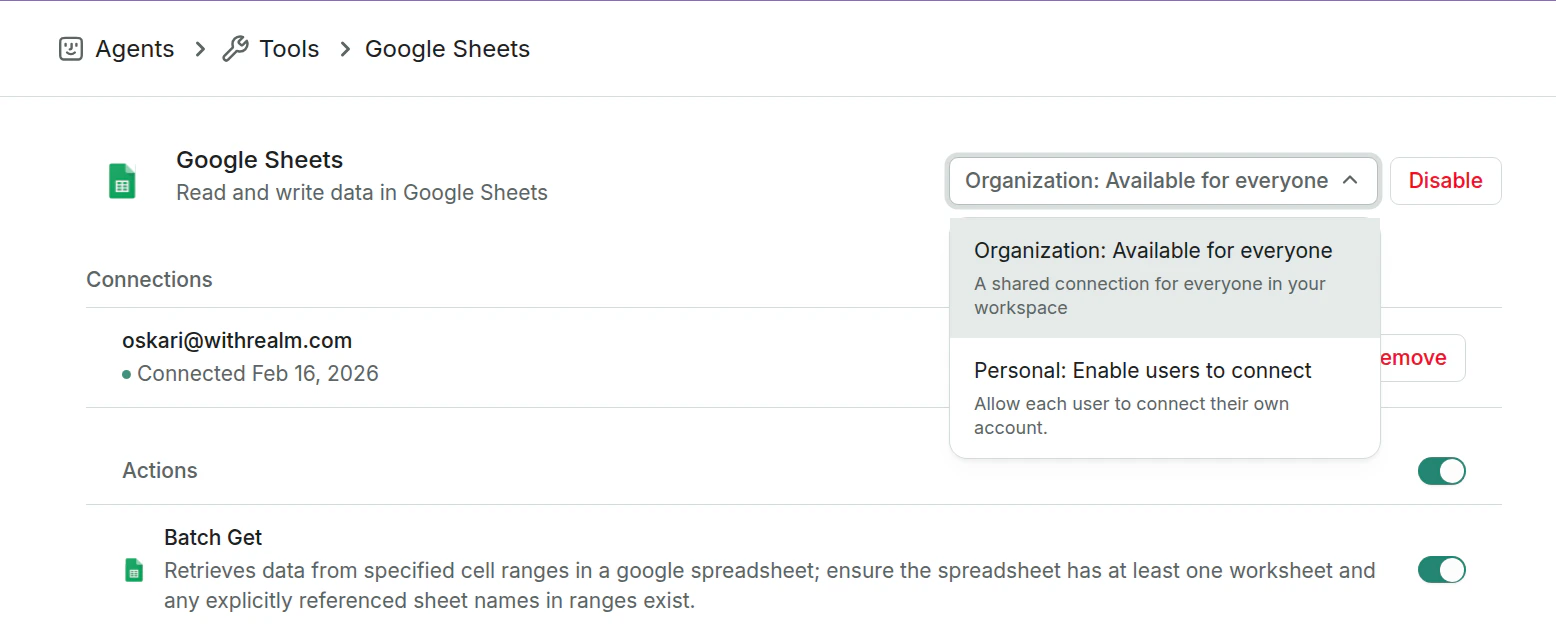 Click **Connect** or **Connect for everyone** to connect the tool.
For GitHub, GitHub may show **Request** or **Install and request** when an organization owner must approve the Realm GitHub Agent. Realm remains disconnected while approval is pending. After an owner installs the app, return to Realm and connect GitHub again.
Click **Connect** or **Connect for everyone** to connect the tool.
For GitHub, GitHub may show **Request** or **Install and request** when an organization owner must approve the Realm GitHub Agent. Realm remains disconnected while approval is pending. After an owner installs the app, return to Realm and connect GitHub again.
 ## Managing tools
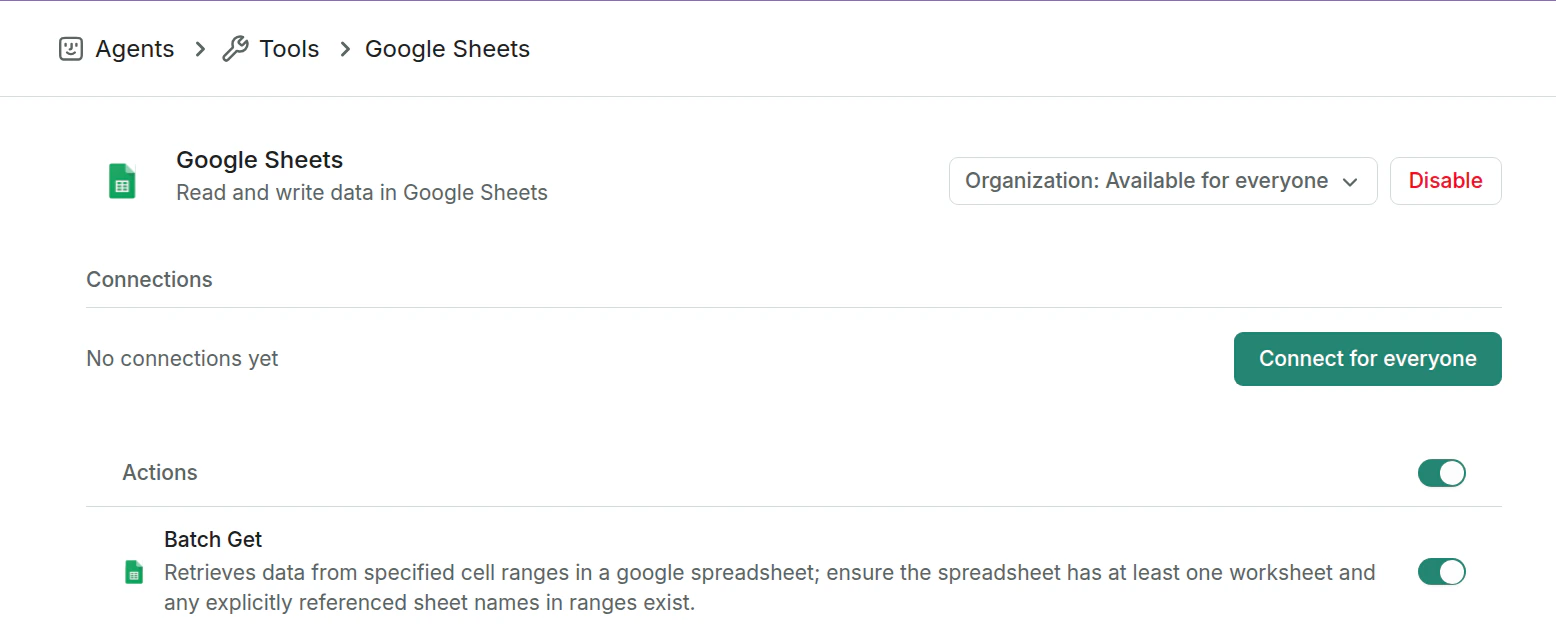
Once a tool is enabled, click **Configure** to manage its actions, settings, and connections.
### Actions
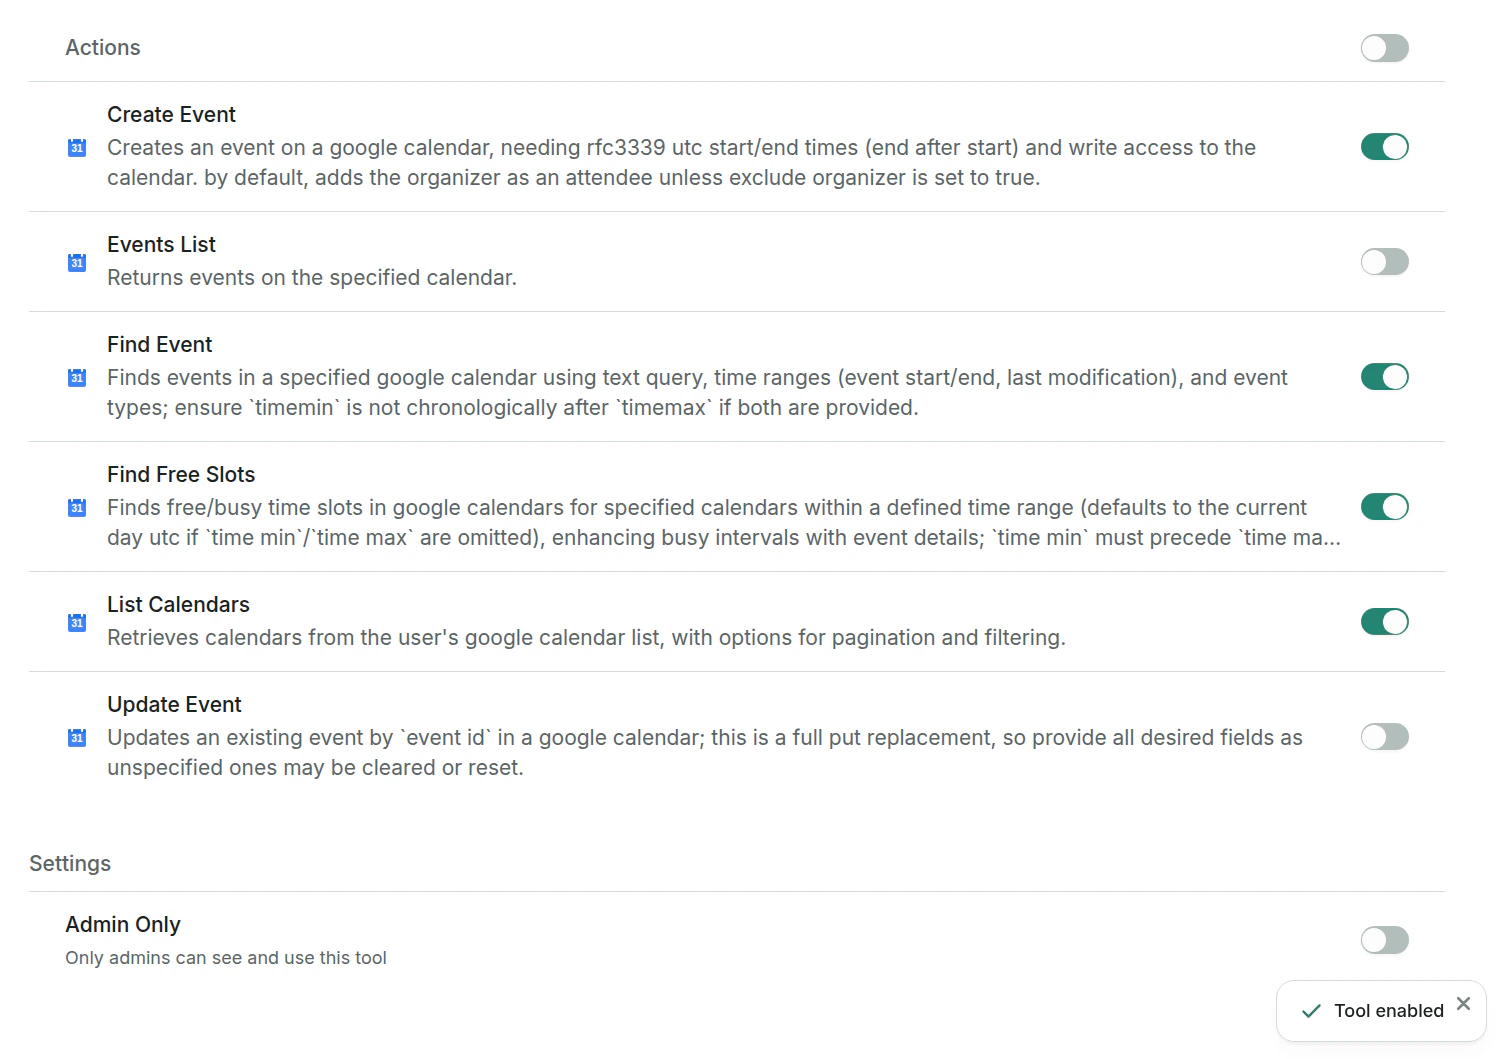
Each tool exposes individual actions (e.g. "Create Ticket", "Update Contact"). You can toggle specific actions on or off to control exactly what agents are allowed to do with a tool.
## Managing tools
Once a tool is enabled, click **Configure** to manage its actions, settings, and connections.
### Actions
Each tool exposes individual actions (e.g. "Create Ticket", "Update Contact"). You can toggle specific actions on or off to control exactly what agents are allowed to do with a tool.
 ### Per-agent configuration
For more details on how tools work within agents, see the [User guide:
Agents](/agents/creating-agents#tools).
You can also configure actions and parameters per agent. To access this, go to **Agents** in the sidebar, click on an agent, then click **Edit** in the header. In the **Tools** section, click **Set rules...** on a connected tool.
### Per-agent configuration
For more details on how tools work within agents, see the [User guide:
Agents](/agents/creating-agents#tools).
You can also configure actions and parameters per agent. To access this, go to **Agents** in the sidebar, click on an agent, then click **Edit** in the header. In the **Tools** section, click **Set rules...** on a connected tool.
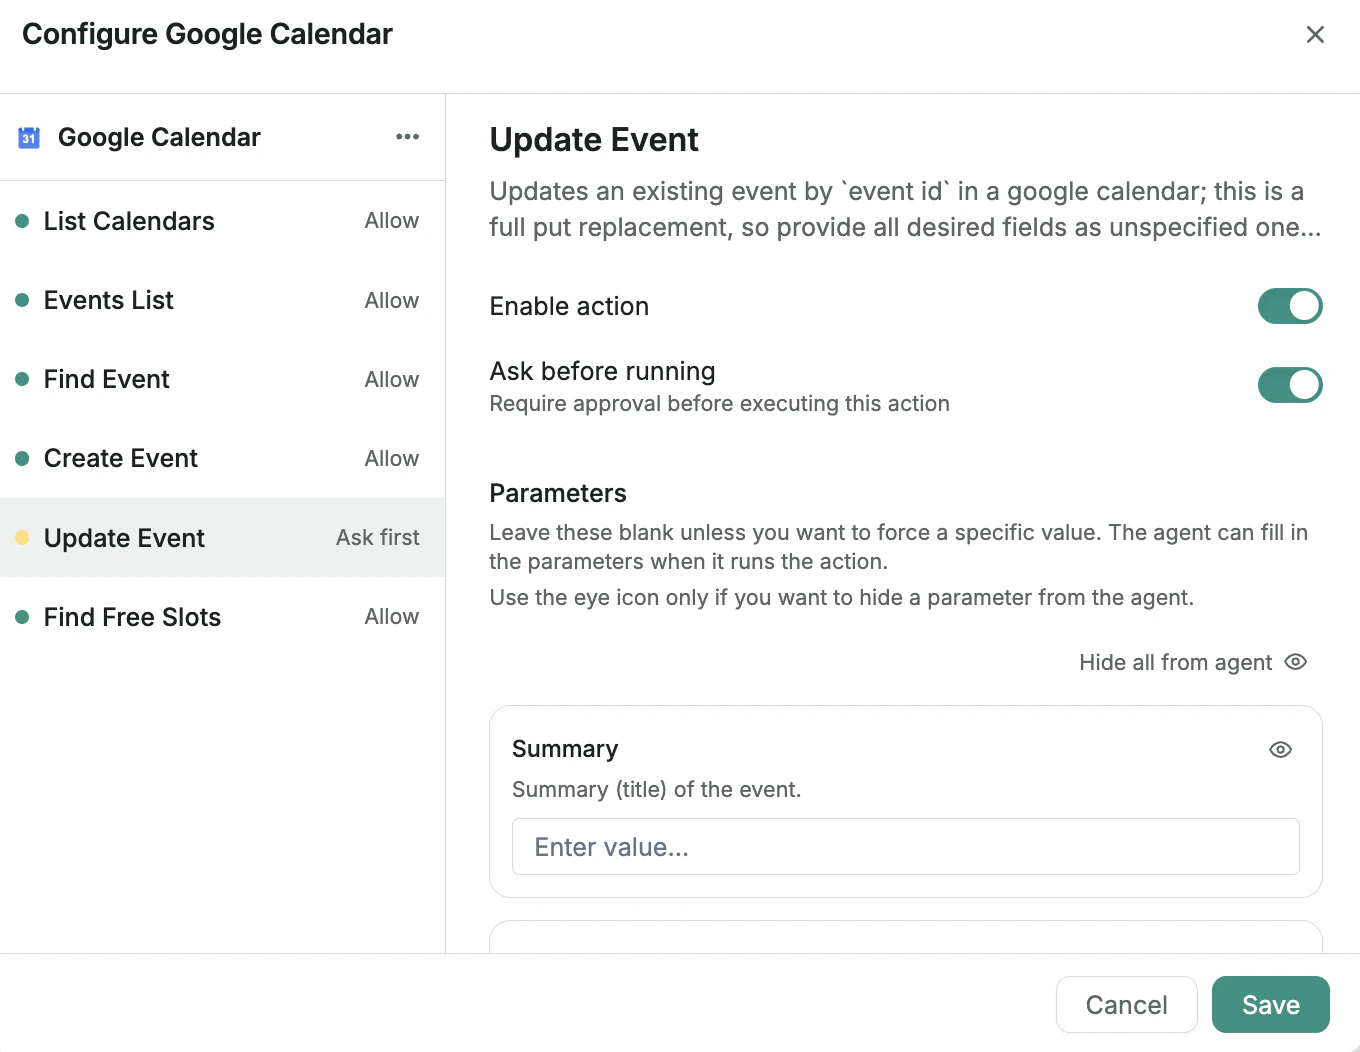 **Action modes** control whether each action is allowed:
| Mode | Behavior |
| ------------- | -------------------------------------------------------------- |
| **On** | The agent can use this action freely |
| **Off** | The action is disabled for this agent |
| **Ask first** | The agent must get user confirmation before running the action |
**Parameter overrides** let you lock down specific parameters:
| Override | Behavior |
| --------------------- | ----------------------------------------------------------------------------------- |
| **Preset parameters** | Lock a parameter to a specific value (e.g. always send to a specific Slack channel) |
| **Hidden parameters** | Hide a parameter from the model so it can't be changed or seen by the agent |
Some actions also include behavior settings. For Slack's post-message action,
turn off **Summary thread for long messages** if you want long messages posted
directly instead of as a short parent message with the full content in a thread.
### Settings
Each tool has a **Settings** section with configuration options.
**Action modes** control whether each action is allowed:
| Mode | Behavior |
| ------------- | -------------------------------------------------------------- |
| **On** | The agent can use this action freely |
| **Off** | The action is disabled for this agent |
| **Ask first** | The agent must get user confirmation before running the action |
**Parameter overrides** let you lock down specific parameters:
| Override | Behavior |
| --------------------- | ----------------------------------------------------------------------------------- |
| **Preset parameters** | Lock a parameter to a specific value (e.g. always send to a specific Slack channel) |
| **Hidden parameters** | Hide a parameter from the model so it can't be changed or seen by the agent |
Some actions also include behavior settings. For Slack's post-message action,
turn off **Summary thread for long messages** if you want long messages posted
directly instead of as a short parent message with the full content in a thread.
### Settings
Each tool has a **Settings** section with configuration options.
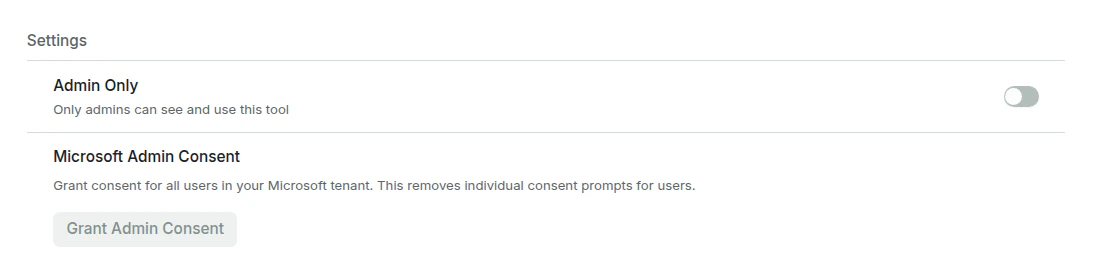 **Admin Only** toggles the tool so only admins can see and use it. This is useful for tools that perform sensitive operations.
**Microsoft Admin Consent** is available for Microsoft tools like Outlook and Microsoft 365. Click **Grant Admin Consent** to grant consent for all users in your Microsoft tenant. This removes individual consent prompts, so users can connect the tool without going through Microsoft's approval flow themselves.
### Changing scope
You can switch a tool between **Organization** and **Personal** scope after it's been enabled.
Changing scope may remove existing connections. Users will need to
re-authenticate after the change.
### Disabling a Tool
Disabling a tool removes all connections and makes it unavailable across the workspace. You can re-enable it at any time.
### Connections
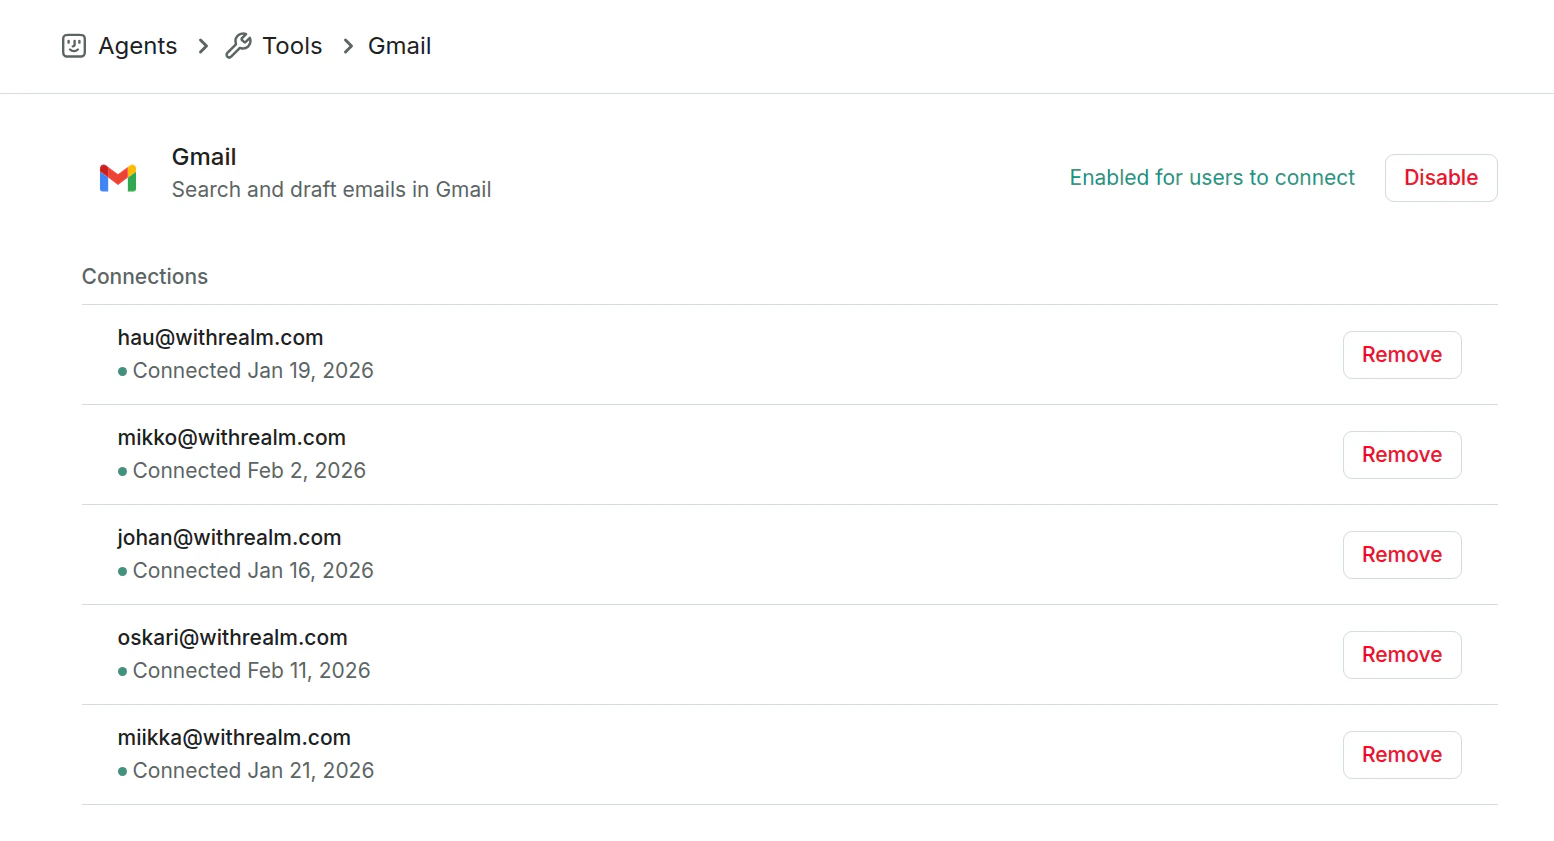
View all active connections for a tool, including:
* Who is connected
* Connection status
* Option to remove individual connections
For **Salesforce**, the list shows the Salesforce account that authorized the
connection, with the Realm user who ran the connect flow shown as
**Connected by**. Agent actions run with that Salesforce account's permissions,
not the Realm user's.
An organization-scope connection is shared by everyone in the workspace and
runs on a single Salesforce login. Consider authenticating with a dedicated
Salesforce integration user with a scoped permission set rather than a
personal account. The **Connections** list is where you verify which account
is in use.
**Admin Only** toggles the tool so only admins can see and use it. This is useful for tools that perform sensitive operations.
**Microsoft Admin Consent** is available for Microsoft tools like Outlook and Microsoft 365. Click **Grant Admin Consent** to grant consent for all users in your Microsoft tenant. This removes individual consent prompts, so users can connect the tool without going through Microsoft's approval flow themselves.
### Changing scope
You can switch a tool between **Organization** and **Personal** scope after it's been enabled.
Changing scope may remove existing connections. Users will need to
re-authenticate after the change.
### Disabling a Tool
Disabling a tool removes all connections and makes it unavailable across the workspace. You can re-enable it at any time.
### Connections
View all active connections for a tool, including:
* Who is connected
* Connection status
* Option to remove individual connections
For **Salesforce**, the list shows the Salesforce account that authorized the
connection, with the Realm user who ran the connect flow shown as
**Connected by**. Agent actions run with that Salesforce account's permissions,
not the Realm user's.
An organization-scope connection is shared by everyone in the workspace and
runs on a single Salesforce login. Consider authenticating with a dedicated
Salesforce integration user with a scoped permission set rather than a
personal account. The **Connections** list is where you verify which account
is in use.
 ### Google file picker
For **Google Drive** and **Google Sheets** tool connections, the **Connections** list includes a **Pick files** button.
Use this when you want to authorize specific Google files for an existing tool connection.
When you click **Pick files**, Realm opens the Google Picker using the credentials from that connection. You can choose one or more files from Google Drive, and Realm stores those selections on the connector for later tool use.
For the **Google Sheets** tool, pick every spreadsheet that agents need to read or update. Connecting Google Sheets authorizes the account, but the spreadsheets still need to be selected with **Pick files** before agents can update them through the Google Sheets tool.
The picker uses the permissions of the connected Google account. It does not
grant access to files the account cannot already open in Google Drive.
To use it:
Go to **Agents** > **Tools** or **Settings** > **Tools**, then open **Google Drive** or **Google Sheets**.
In the **Connections** section, locate the connection you want to update.
Click **Pick files**. Google Picker will open in a popup window.
Select one or more files from Google Drive, then confirm the selection. For Google Sheets updates, select the spreadsheets the agent should be allowed to update.
Realm adds the selected files to that connection immediately. If you use the picker again later, the new selection is merged with the files already stored on the connector.
## MCP Servers
MCP (Model Context Protocol) is a protocol for connecting agents to external tools and data sources. You can add custom MCP servers to extend what your agents can do.
MCP servers are not available on trial plans.
### Adding a Server
Click **Add MCP Server** from the Tools page. You can either connect a **Featured MCP Server** with one click, or add a custom server manually.
### Google file picker
For **Google Drive** and **Google Sheets** tool connections, the **Connections** list includes a **Pick files** button.
Use this when you want to authorize specific Google files for an existing tool connection.
When you click **Pick files**, Realm opens the Google Picker using the credentials from that connection. You can choose one or more files from Google Drive, and Realm stores those selections on the connector for later tool use.
For the **Google Sheets** tool, pick every spreadsheet that agents need to read or update. Connecting Google Sheets authorizes the account, but the spreadsheets still need to be selected with **Pick files** before agents can update them through the Google Sheets tool.
The picker uses the permissions of the connected Google account. It does not
grant access to files the account cannot already open in Google Drive.
To use it:
Go to **Agents** > **Tools** or **Settings** > **Tools**, then open **Google Drive** or **Google Sheets**.
In the **Connections** section, locate the connection you want to update.
Click **Pick files**. Google Picker will open in a popup window.
Select one or more files from Google Drive, then confirm the selection. For Google Sheets updates, select the spreadsheets the agent should be allowed to update.
Realm adds the selected files to that connection immediately. If you use the picker again later, the new selection is merged with the files already stored on the connector.
## MCP Servers
MCP (Model Context Protocol) is a protocol for connecting agents to external tools and data sources. You can add custom MCP servers to extend what your agents can do.
MCP servers are not available on trial plans.
### Adding a Server
Click **Add MCP Server** from the Tools page. You can either connect a **Featured MCP Server** with one click, or add a custom server manually.

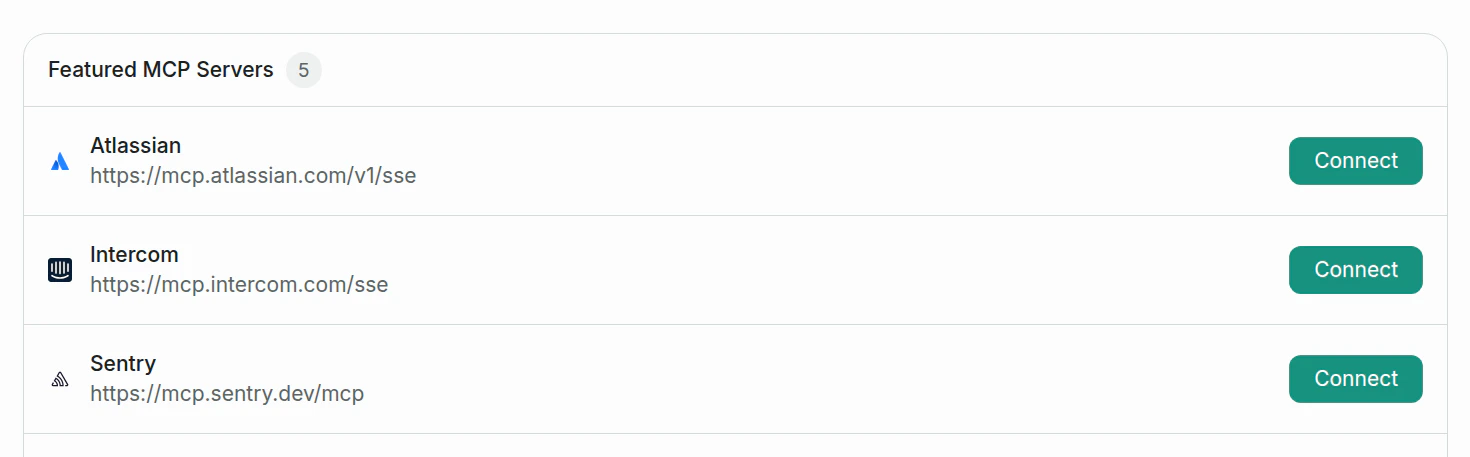 Provide the URL of the MCP server.
Select **HTTP** or **SSE** (Server-Sent Events).
Choose **OAuth** or **Bearer Token** and enter the required credentials. You can also add **custom headers** (e.g. `x-api-key` or vendor version headers). The `Authorization` header is managed separately by the authentication type.
Optionally give the connection a descriptive name. This is useful when connecting to the same server multiple times with different credentials.
Click **Connect** to complete the setup.
Provide the URL of the MCP server.
Select **HTTP** or **SSE** (Server-Sent Events).
Choose **OAuth** or **Bearer Token** and enter the required credentials. You can also add **custom headers** (e.g. `x-api-key` or vendor version headers). The `Authorization` header is managed separately by the authentication type.
Optionally give the connection a descriptive name. This is useful when connecting to the same server multiple times with different credentials.
Click **Connect** to complete the setup.
 ### Featured servers
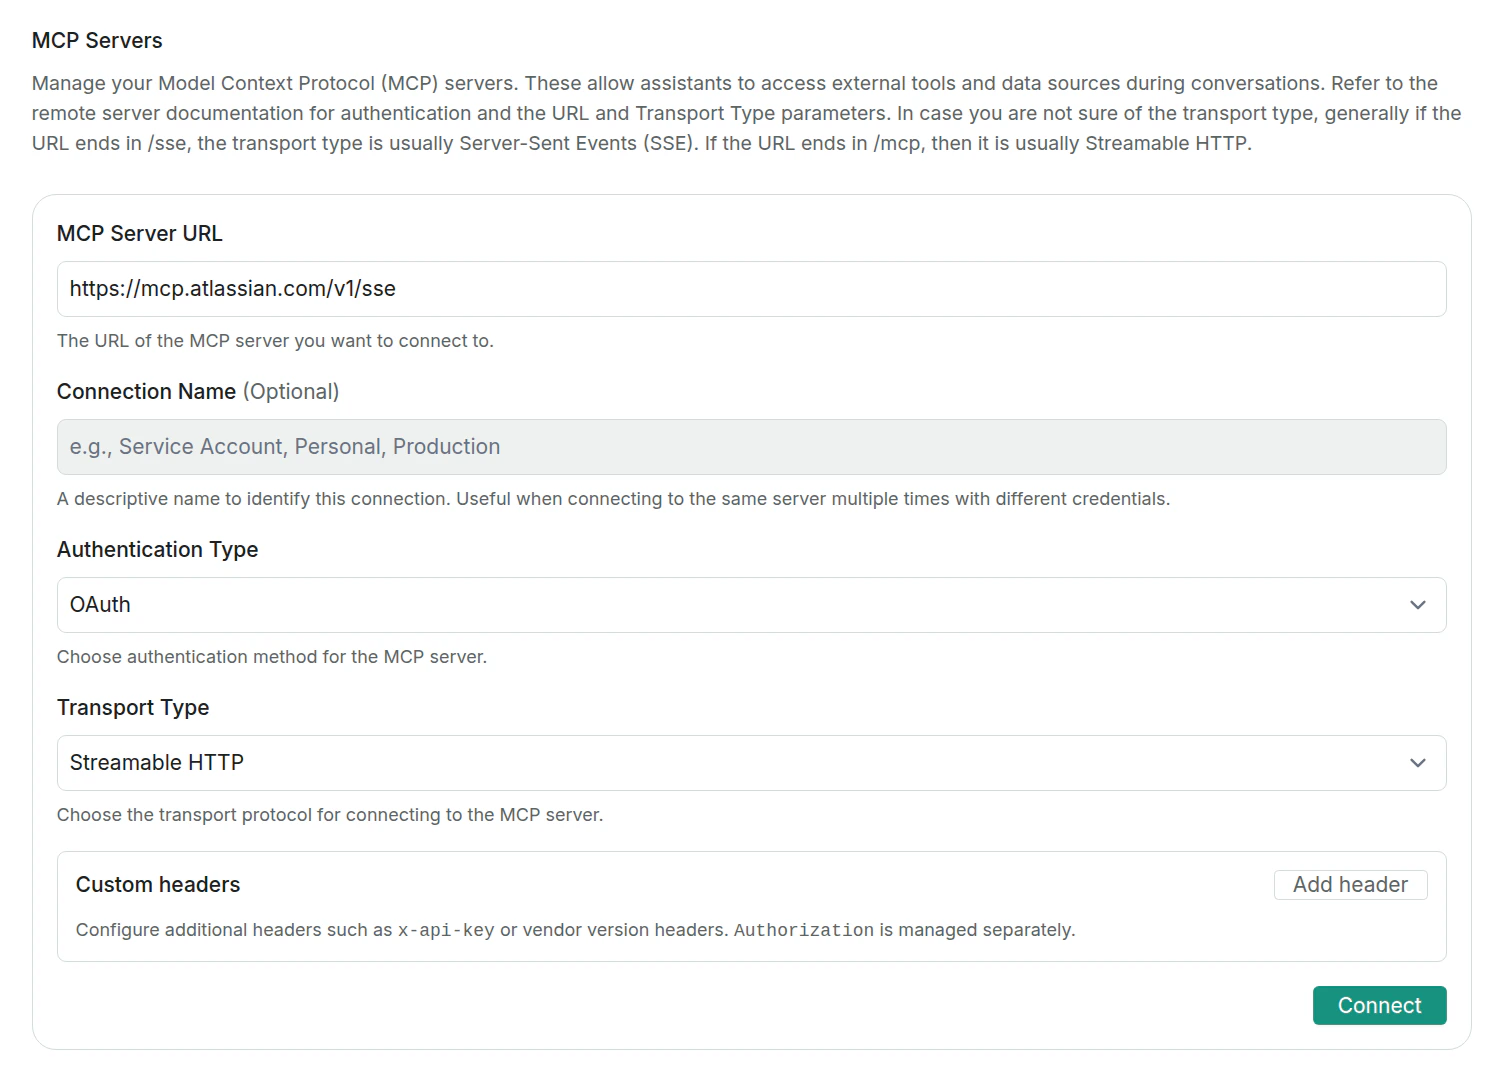
Realm highlights these featured MCP servers for quick one-click setup:
### Managing servers
Once added, you can **reconnect** or **delete** MCP servers from the Tools page.
## Troubleshooting
### Salesforce: OAuth Error When Connecting
When connecting the Salesforce tool, you may see an OAuth error page like this:
### Featured servers
Realm highlights these featured MCP servers for quick one-click setup:
### Managing servers
Once added, you can **reconnect** or **delete** MCP servers from the Tools page.
## Troubleshooting
### Salesforce: OAuth Error When Connecting
When connecting the Salesforce tool, you may see an OAuth error page like this:
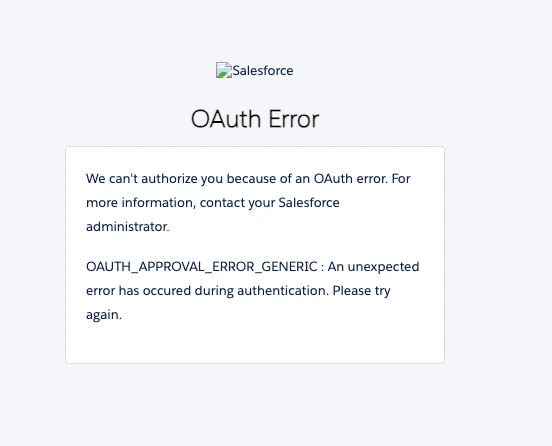 This is typically caused by a recent Salesforce security change that requires connected apps to be explicitly installed before they can be used. You can confirm this is the issue by checking the URL in your browser's address bar. If it contains `error=invalid_client&error_description=app+must+be+installed+into+org`, then the Realm app needs to be installed in your Salesforce org.
**To fix this:**
Log in to Salesforce as an admin and go to **Setup** > **Connected Apps OAuth Usage**.
Find the **Realm** app in the list and click **Install**.
This is typically caused by a recent Salesforce security change that requires connected apps to be explicitly installed before they can be used. You can confirm this is the issue by checking the URL in your browser's address bar. If it contains `error=invalid_client&error_description=app+must+be+installed+into+org`, then the Realm app needs to be installed in your Salesforce org.
**To fix this:**
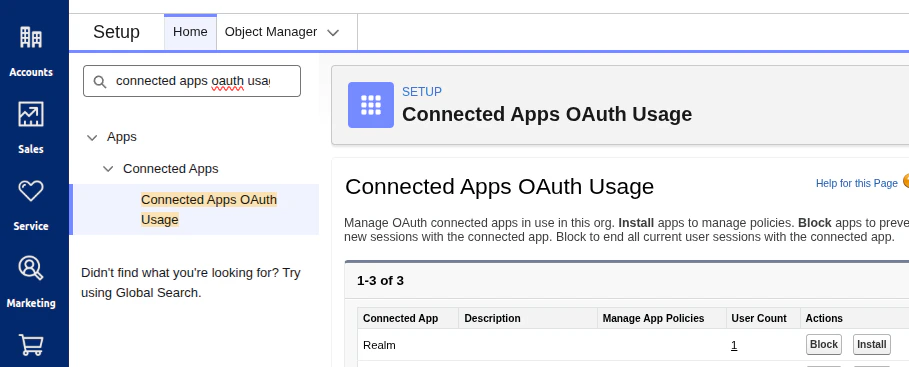
Log in to Salesforce as an admin and go to **Setup** > **Connected Apps OAuth Usage**.
Find the **Realm** app in the list and click **Install**.
 Return to Realm and try connecting the Salesforce tool again.
For more details, see [this Salesforce article](https://help.salesforce.com/s/articleView?id=005132365\&type=1).
## Admin vs user permissions
| Capability | Admin | Regular User |
| ----------------------------- | ----- | ------------ |
| Enable/disable tools | Yes | No |
| Change connection scope | Yes | No |
| Set admin-only restriction | Yes | No |
| Grant Microsoft Admin Consent | Yes | No |
| View all connections | Yes | No |
| Connect personal-auth tools | Yes | Yes |
| View enabled tools | Yes | Yes |
| Manage own connections | Yes | Yes |
Return to Realm and try connecting the Salesforce tool again.
For more details, see [this Salesforce article](https://help.salesforce.com/s/articleView?id=005132365\&type=1).
## Admin vs user permissions
| Capability | Admin | Regular User |
| ----------------------------- | ----- | ------------ |
| Enable/disable tools | Yes | No |
| Change connection scope | Yes | No |
| Set admin-only restriction | Yes | No |
| Grant Microsoft Admin Consent | Yes | No |
| View all connections | Yes | No |
| Connect personal-auth tools | Yes | Yes |
| View enabled tools | Yes | Yes |
| Manage own connections | Yes | Yes |