
Before you start
Do these things before you write your first document.- Open Documents. Click Documents in the sidebar. The Documents page opens.
- Put your source files in the knowledge base. The knowledge base is the company information that Realm is connected to. It includes documents, messages and data from your workplace tools. To see it, go to Knowledge > Browse knowledge in the main sidebar. See Browsing knowledge.
- Or put your source files in a project. Use a project when the files are only for one bid or one customer.
- Ask an admin about a default template layout. An admin can set a default template layout for your exports in Settings > Organization settings, under Document template. If your team uses a fixed template layout, ask your admin to set it. See Document template.
Start a document
Start a document from the Documents page. The message box sets the request, and the options around it set how Realm writes the document.Choose how Realm writes the document
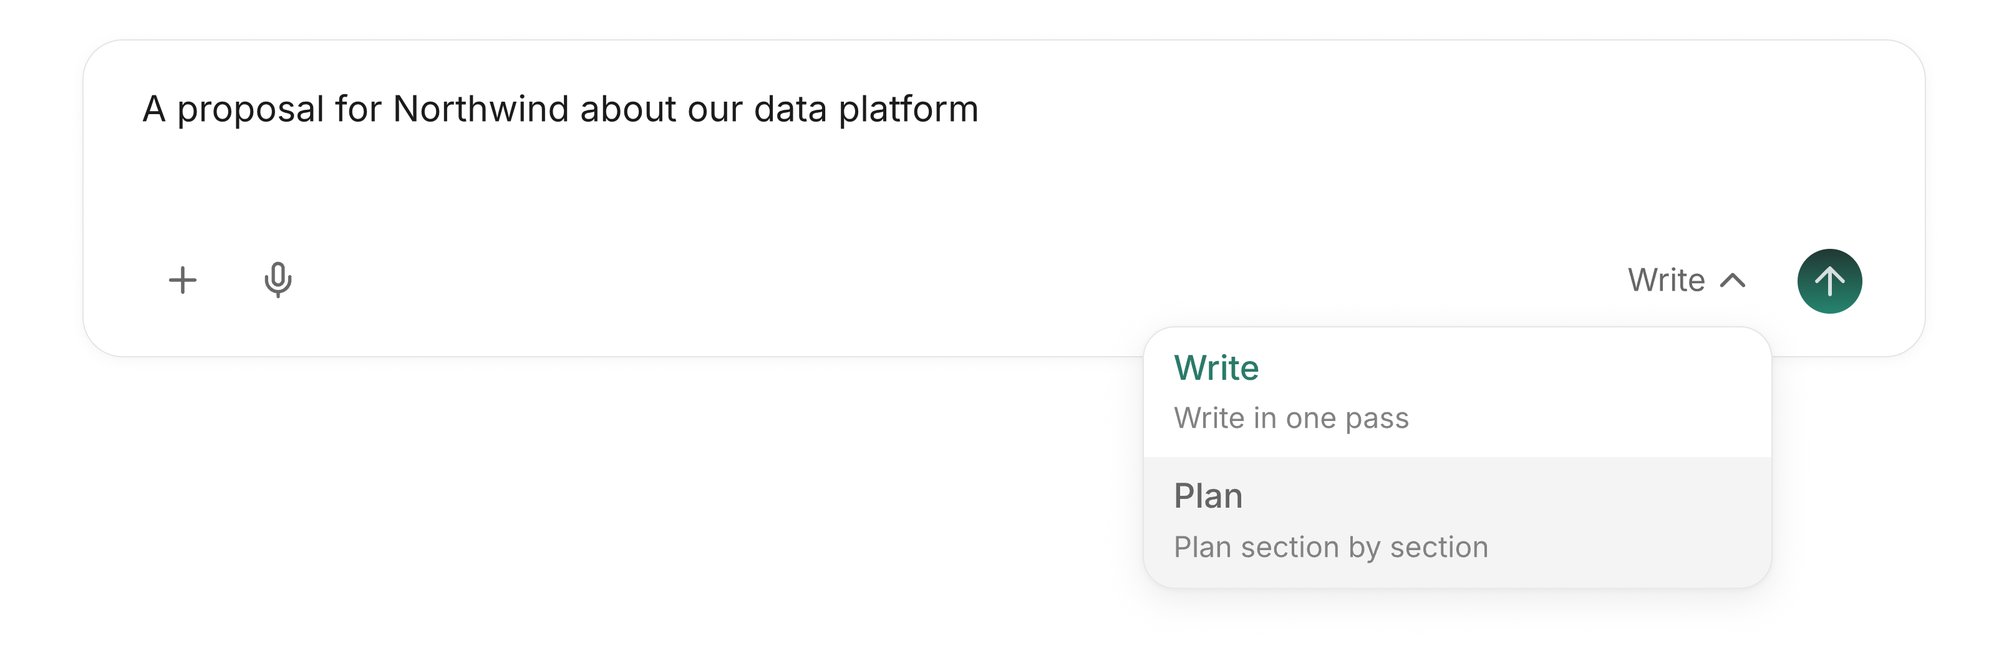
- Click the menu at the bottom right of the message box. The menu shows Write and Plan.
- Click Write to write the document in one pass. Use Write for short documents. Write is the default.
- Or click Plan to plan the document section by section. Use Plan for long documents that need a review of each section.
Add files, a starting point or a skill
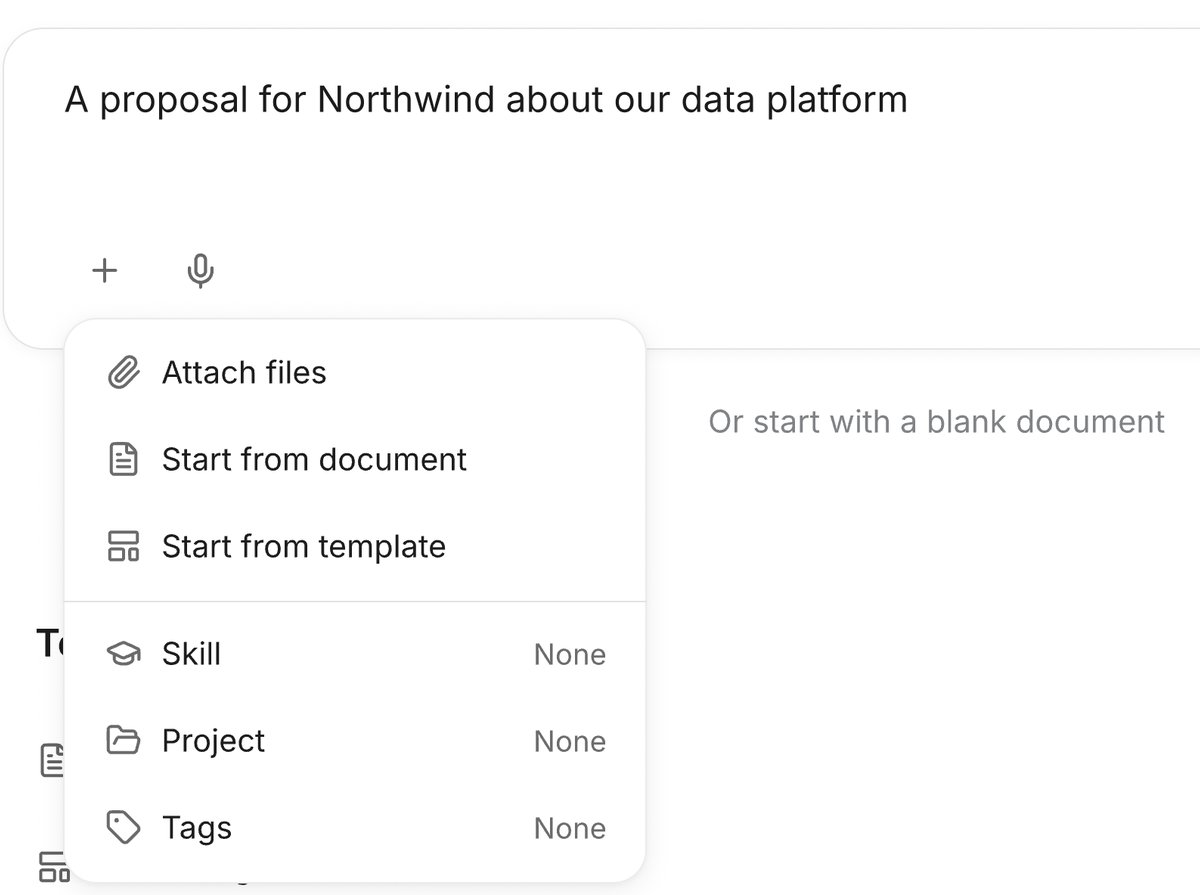
- Click + in the message box. The tooltip reads “Attach files, pick a starting point or a skill.”
- Click Attach files to add files to the request.
- Click Start from document, then choose Upload a file, Your documents or Knowledge base. The draft is based on that document.
- Click Start from template. The menu shows the groups Suggested and All templates.
- Point at a template and click Show to preview it.
- Click a template to use it. Click Add template to make a new template from a file or the knowledge base, or click Browse all templates to see every template.
- Click Skill, then choose a published skill. The skill gives the draft its instructions. If the skill has a template, the draft starts from it.
- Click Project, then choose a project. The document becomes an output of that project. It draws on the project’s files and tags.
- Click Tags, then choose the tags. The document draws only on knowledge with those tags. Tags are offered only when no project is picked.
Plan the document
In this part, you tell Realm what document you need. Realm makes a plan first, so you can examine and change the structure before Realm writes any text.Describe the document
- Type a description of the document in the message box.
- Optional: click + to add files, a starting point or a skill. See Start a document.
- Click Plan instead of Write. Realm will make a plan, not a full draft.
- Send the message. The Plan opens. It shows Instructions, Rules & requirements and Length.
Make the outline
- Read the Instructions, the Rules & requirements and the Length in the Plan. You can see how Realm will write the document.
- Click Write outline. Realm shows the outline as a list of sections.
- Open a section. You see the instructions, key points and requirements for that section.
- Edit the instructions, key points or requirements of the section. The section keeps your changes.
Arrange the sections
- Drag a section to a new position in the outline. The section moves to the new position.
- Drag a section to indent it below another section. The section shows as a subsection.
- Click Add section if the outline needs more sections. A new section shows in the outline.
- Choose an owner in the header of a section. The section now has an owner. The assigned sections show in the My tasks view for that person.
- Click Create document. Realm starts to write the document.
What happens next
Realm writes the sections in the same order as the plan. A spinner shows which section Realm writes now. You do not have to wait on this screen: sections keep drafting after you close the editor. When the sections are ready, you can edit them, fill in placeholders and continue with the steps in Draft and edit. For every field of the plan, tables in sections and how the chat changes the plan, see Planning a document section by section.Draft and edit
When you click Create document, Realm starts drafting the sections of the document. Realm writes the sections one by one in plan order. Do the steps below in the order that you need them.Follow the draft
- Look at the outline. A spinner shows the section that Realm writes now.
- Read the completed sections while Realm writes the next sections. The text of the completed sections stays in the same position.
Check each section in the Plan tab
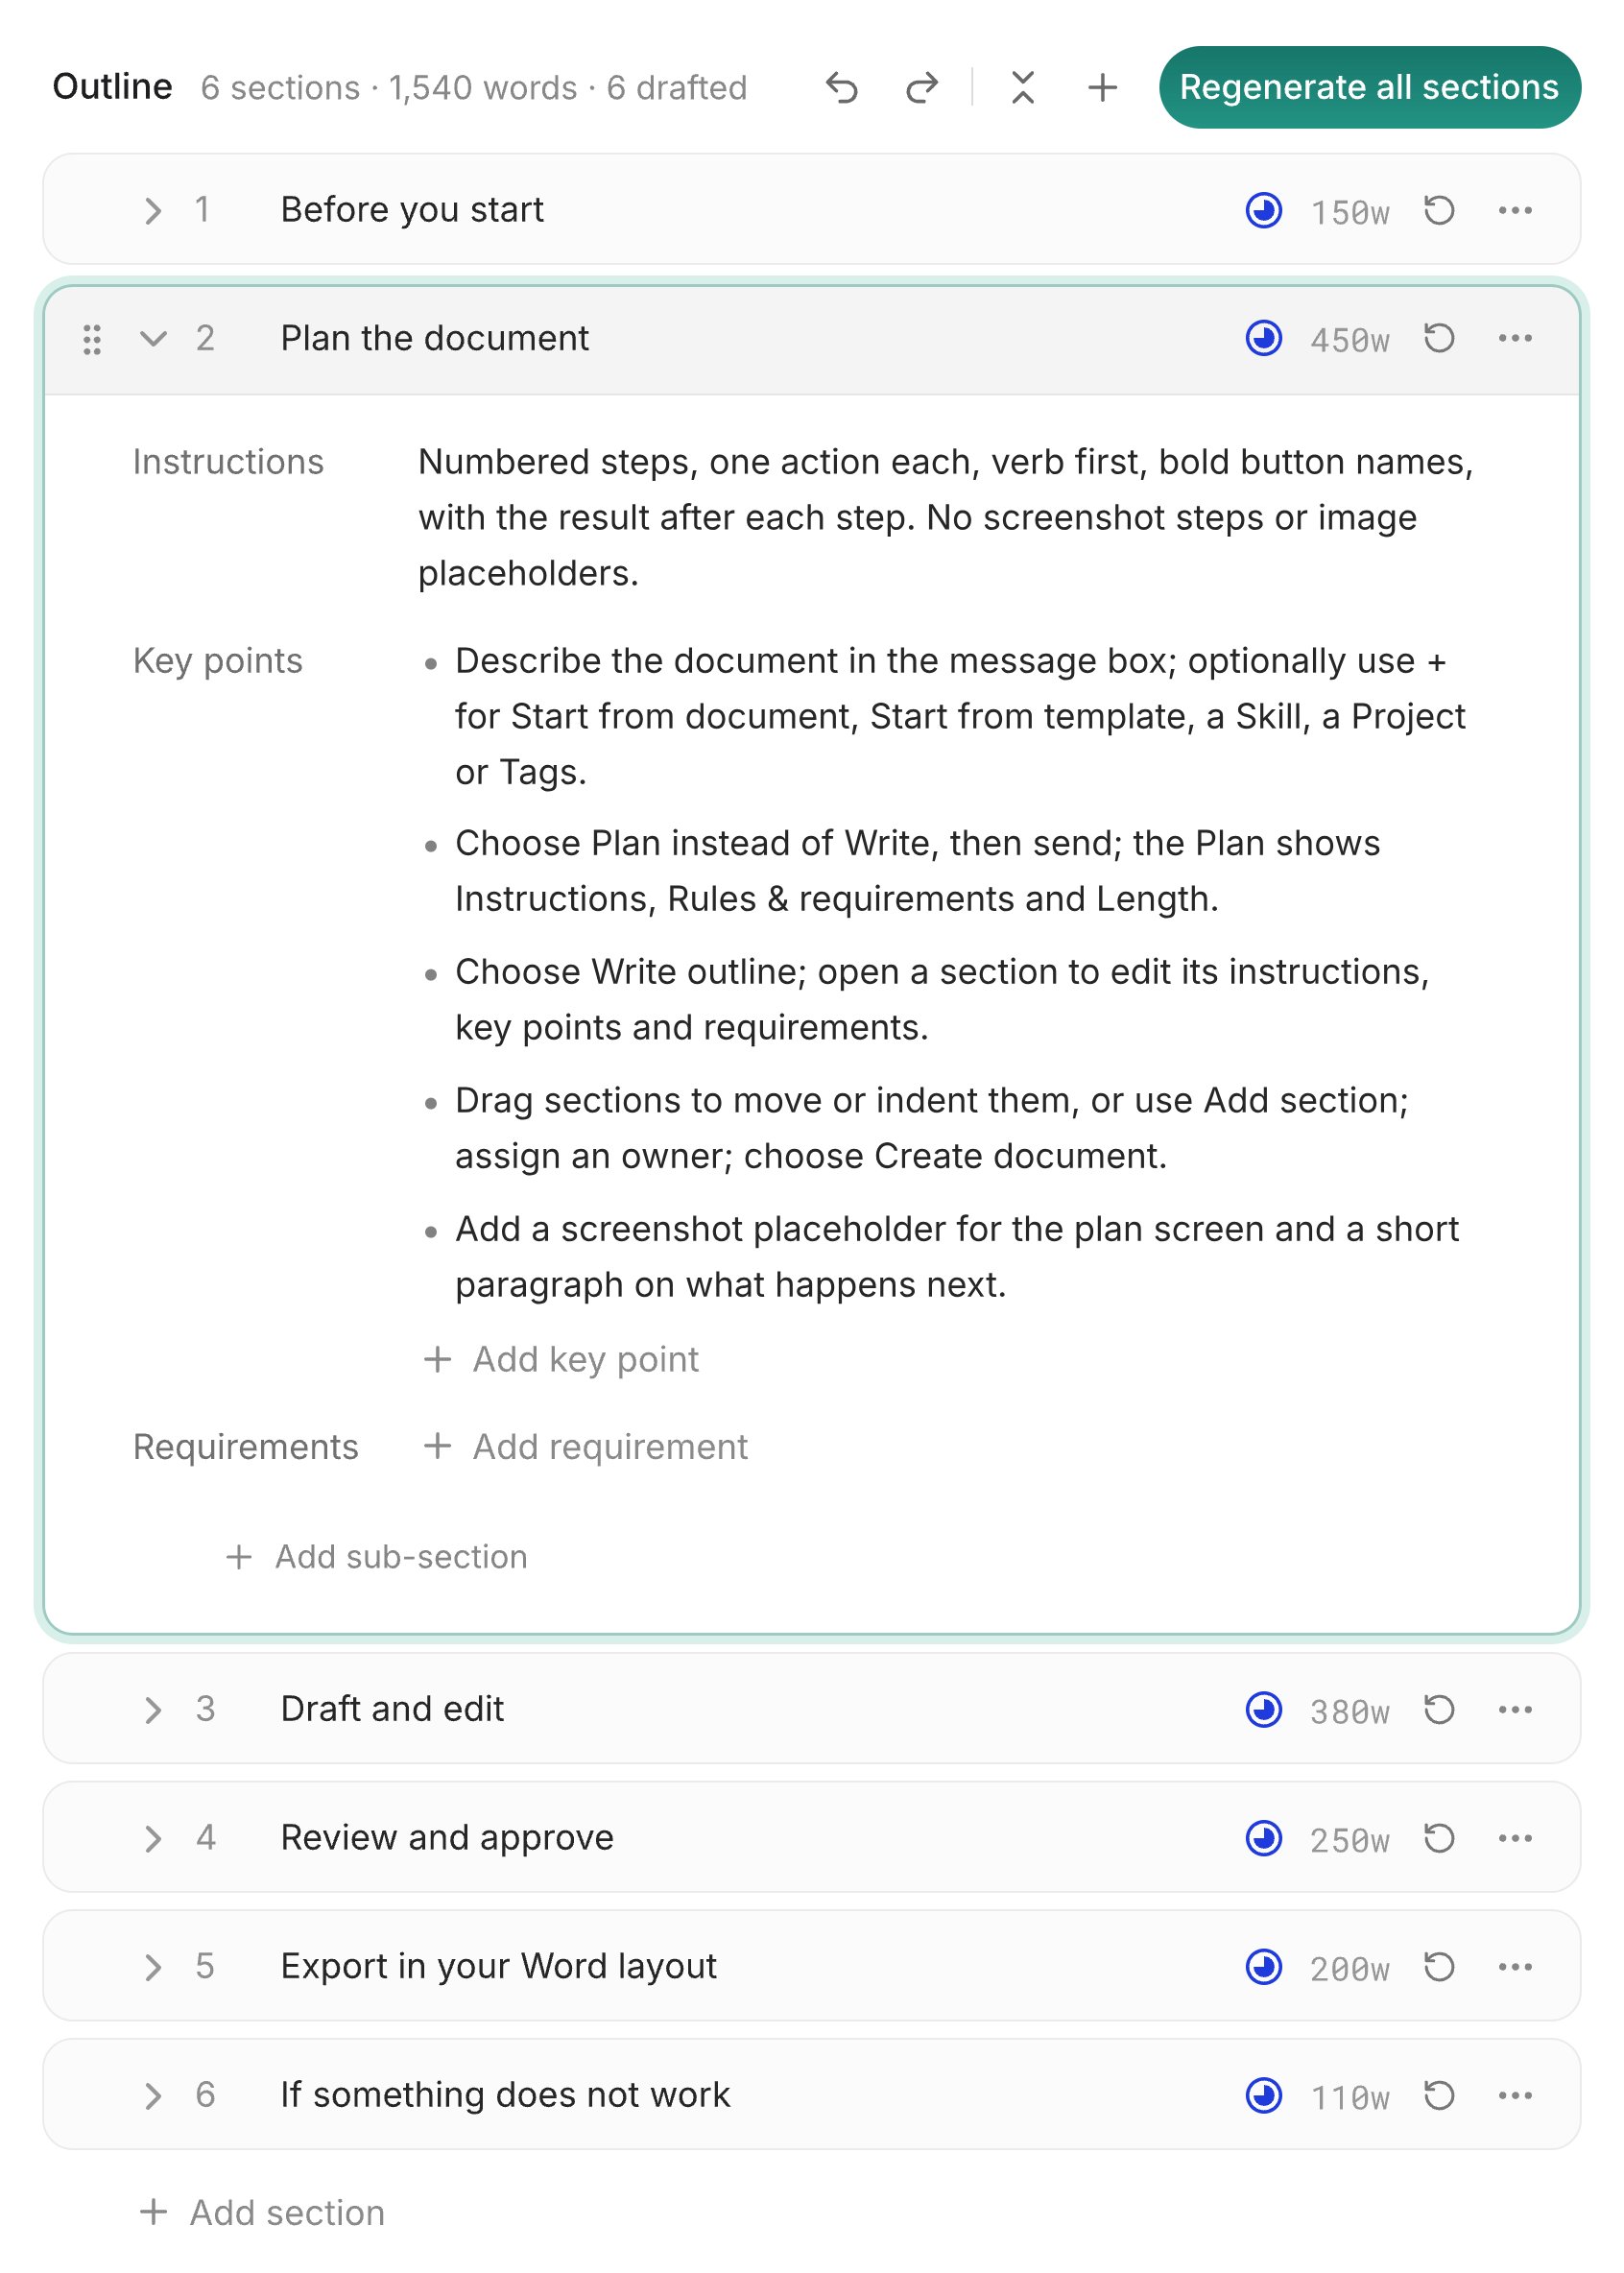
- Select the Plan tab. This tab is beside Write and Preview. You see each section with its placeholders, comments and status.
- Read the status of each section. The status shows if the section is not written, writing, failed, has comments, in review or approved.
- Click the regenerate button of a section to write that section again. Realm drafts a new version of the section. If the section was approved, Realm asks first, because the section goes back to review.
Rewrite one paragraph
Use this procedure to change one paragraph without a rewrite of the full section.- Point at the paragraph and click the sparkle icon at its end, Regenerate with AI. A box opens.
- Type how the paragraph should change, or leave the box empty, and press Enter. Realm rewrites the paragraph in place in a few seconds.
- Press Ctrl+Z (Cmd+Z on Mac) if you want the earlier text again. The earlier text comes back.
Fill placeholders
A placeholder is a blank that Realm cannot fill from your company knowledge, for example a name, a date or a price.- Click a placeholder in the text. A field opens for the value.
- Type the value and press Enter. The placeholder changes to your value.
- Choose Fill all to fill each placeholder that has the same label.
Change the document or the plan with the chat
- Type your request in the chat in the editor. Tell Realm what to change in the document or in the plan.
- Send the request. Realm changes the document or the plan.
- Read the changed sections. Do the steps in this procedure again if you need more changes.
Create a document from a project
Use a project when a tender asks for documents. The project keeps each document with the bid, so your team can find it in one place. For the details of each step, see Document RFP responses.Draft a requested document
Realm reads the project’s files and lists each document they ask for, and that nobody has drafted yet, under Suggested documents. Each suggestion quotes the sentence that asks for it.- Open the project and select the Files tab. The Suggested documents band lists the documents that the project’s files ask for.
- Point at a suggestion and open Create. A menu opens with Upload files…, Create document… and Existing document….
- Choose Create document…. The dialog opens and links the new document to the suggestion.
- Type the request in the message box, or keep the suggested sentence. The message box is the same as on the Documents page.
- Choose Write to draft the document at once, or choose Plan to review the sections first. Realm starts the draft. The suggestion leaves the band when the document is drafted.
Add a deliverable
You can add a new document deliverable to the project from either of the two places below.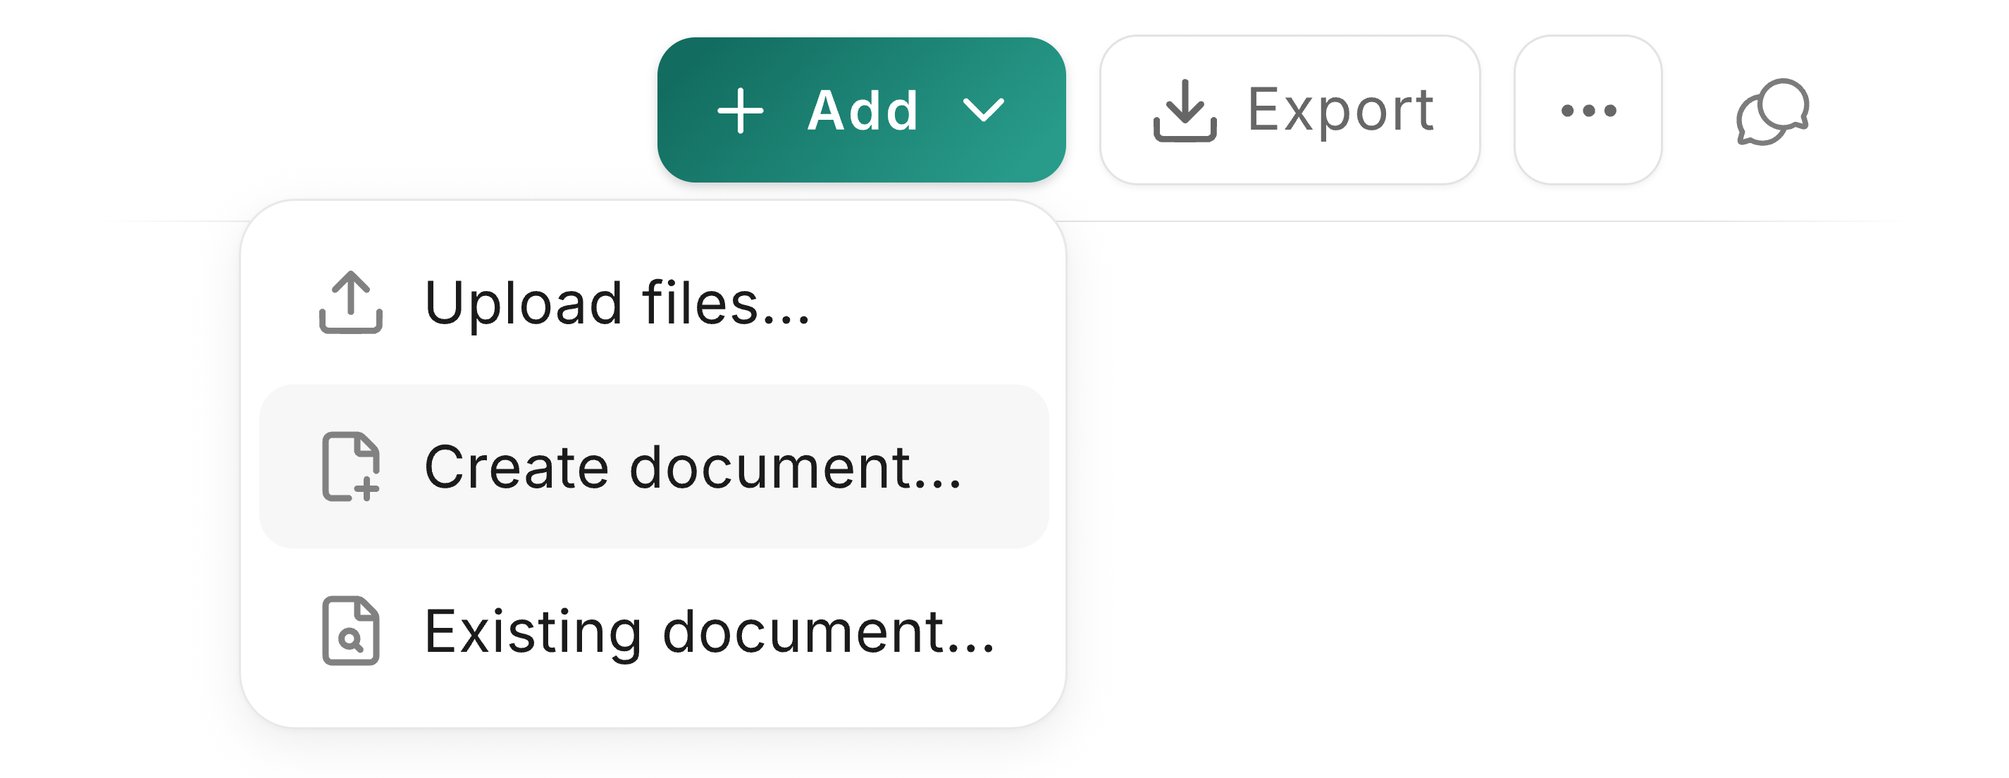
- Choose Add in the project header. A menu opens with Upload files…, Create document… and Existing document….
- Choose Create document…. The Create document dialog opens.
- Select the Files tab and find the Deliverables band.
- Choose Add a deliverable. A menu opens with the same three items: Upload files…, Create document… and Existing document….
Set up the new document
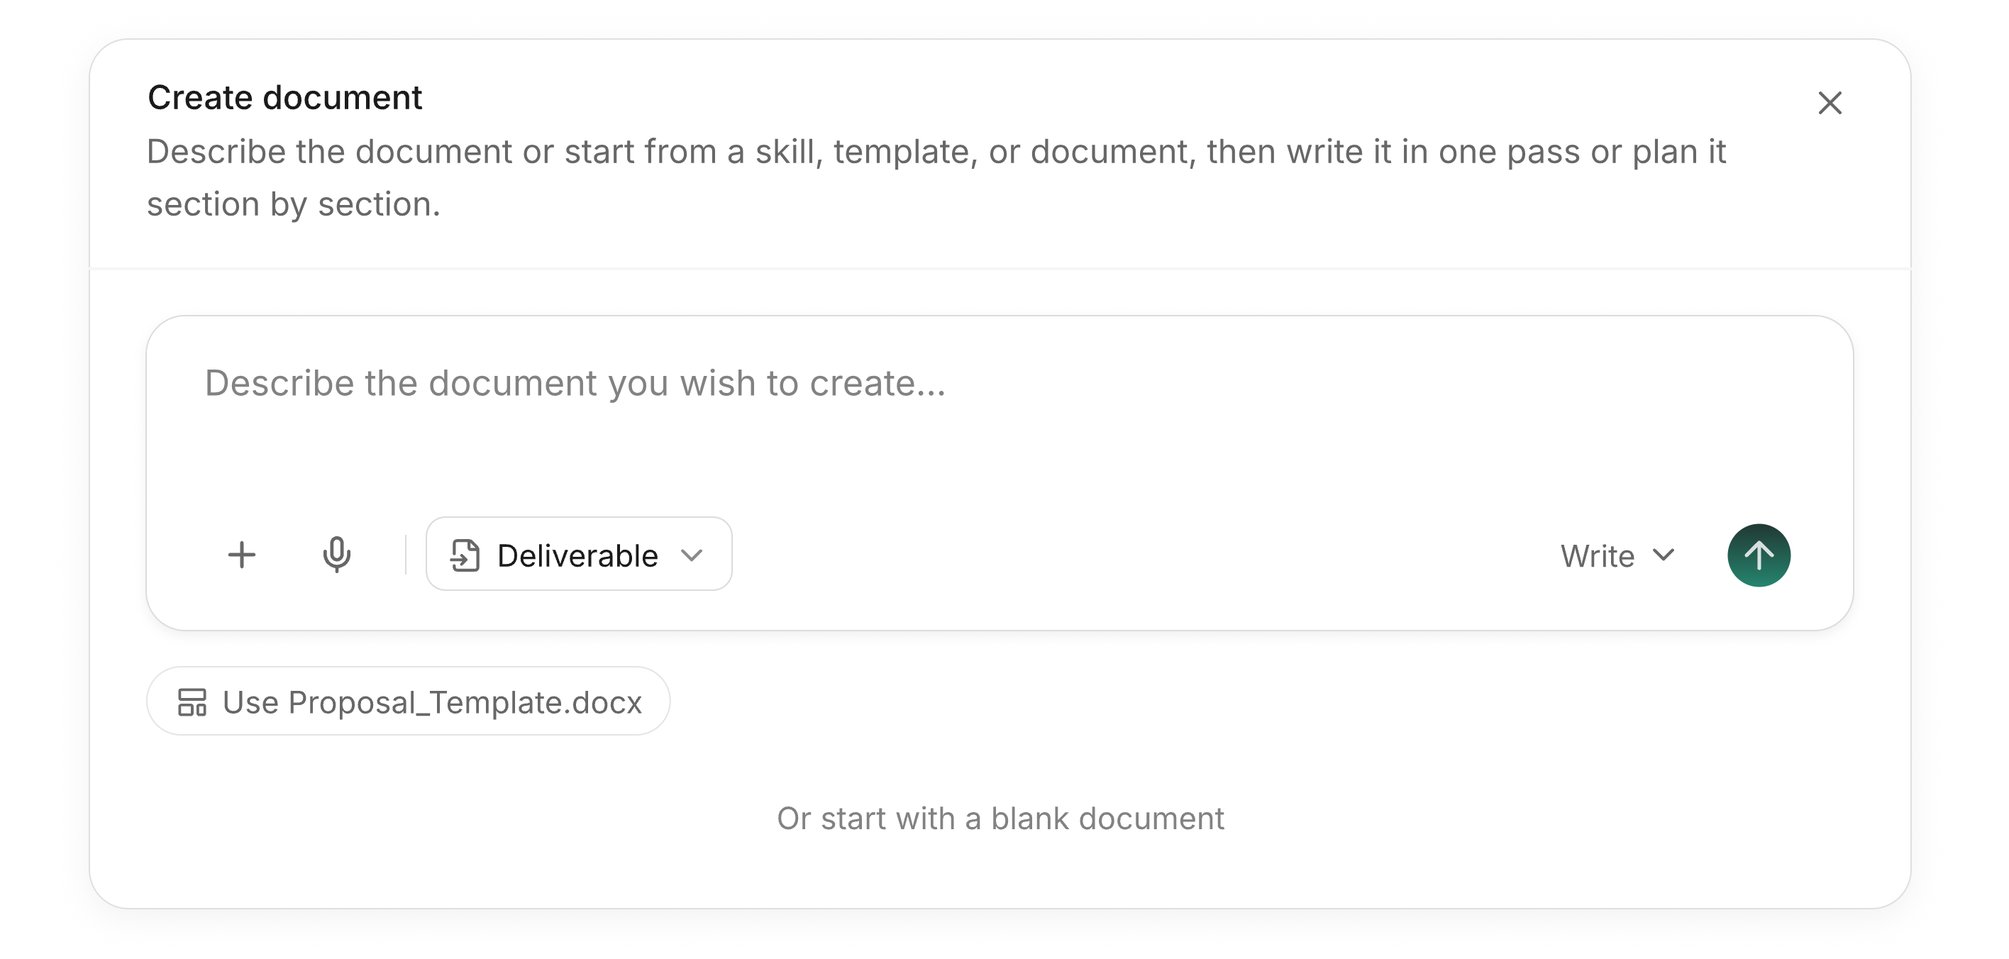
- Type the request in the message box. The message box is the same as on the Documents page.
- Choose Write to draft the document at once, or choose Plan to plan it first.
- Under Role, choose Deliverable or Supporting file.
- Under Linked to, choose a suggestion, or choose None.
- Send the request. Realm drafts the document, and it appears in the project’s files.
Draft from a file or a questionnaire
- Open the options menu on a file row and choose Write response. Realm drafts a written response to that file and opens the editor. Screenshot attachments are included.
- Open the options menu of a questionnaire and choose Turn responses into document. Realm makes a document from its filled answers and screenshot attachments. See Turning responses into a document.
- Open the menu of an answer column header and choose Create document from this column. Realm makes a document from the answers in that column.
Find your way in the editor
Use the views above the document, the sidebar and the header buttons to move around a document and to check it.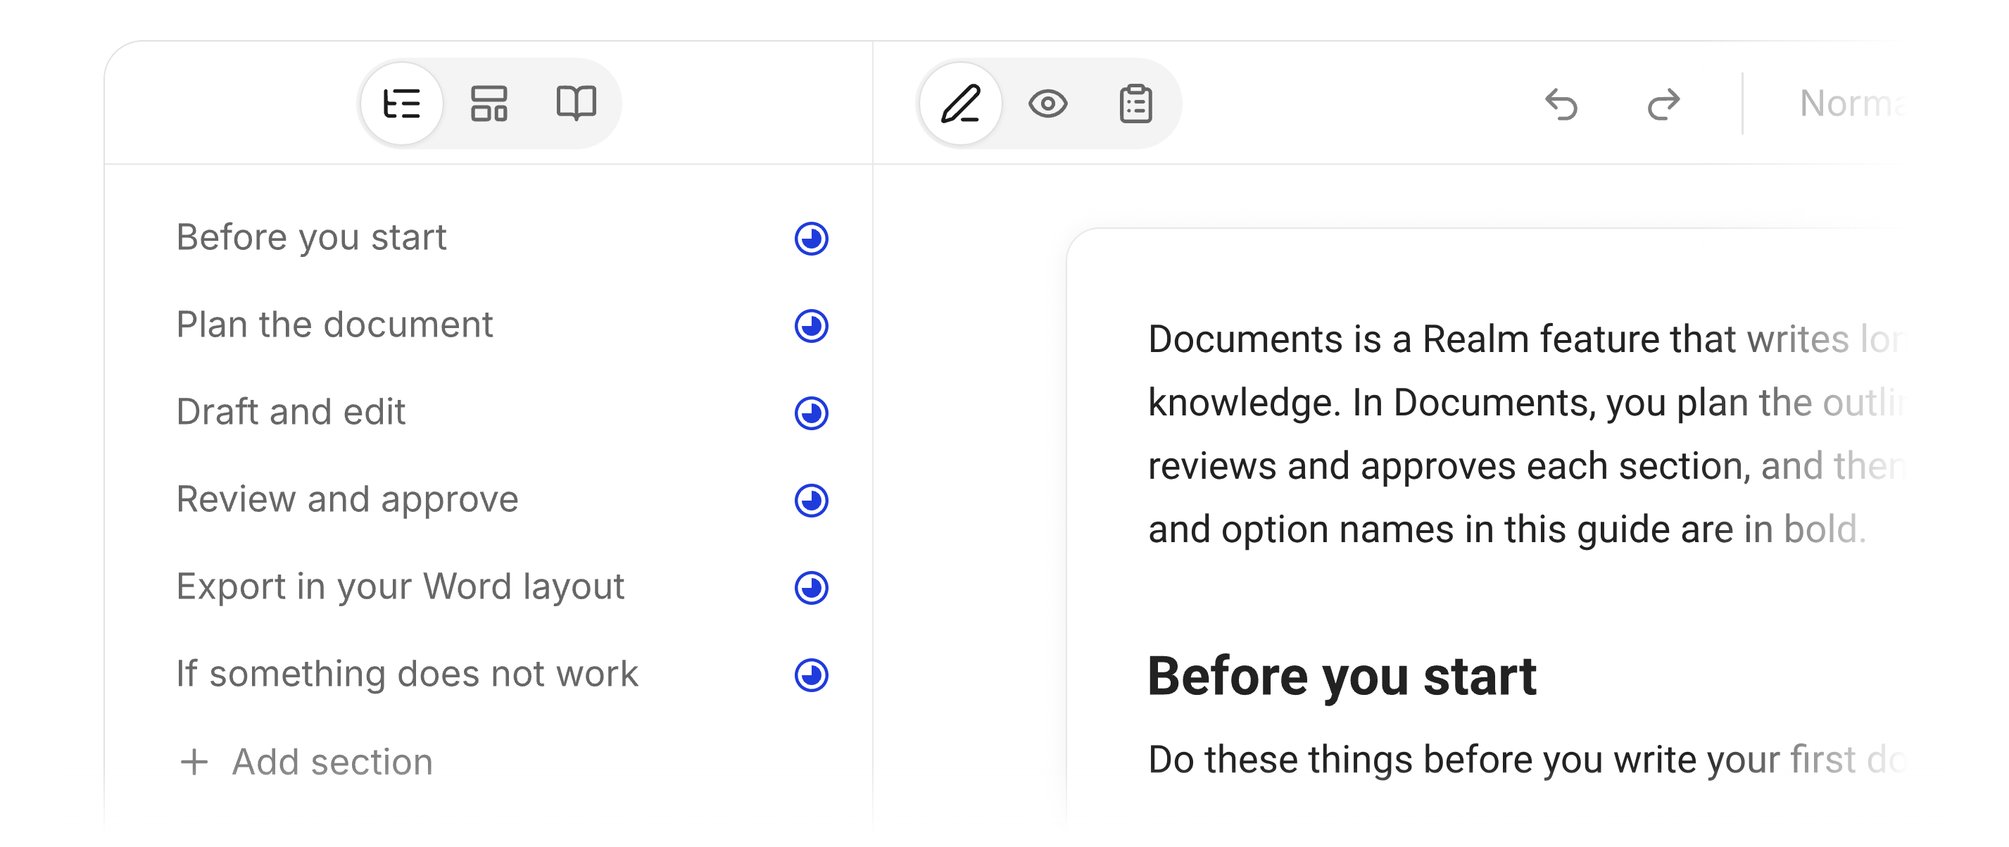
Main tabs
- Write: edit the text.
- Preview: shows the document in its template layout, as it will export.
- Plan: shows only for a planned document. It lists each section with its instructions, key points, status and a regenerate button.
Sidebar tabs
The sidebar sits to the left of the document.- Outline: lists the sections with their status and owner. Click a section to go to it. Use Add section to add a section. Drag a section to move it.
- Placeholders: shows when the document has placeholders. It has one group for each placeholder label. Fill them here, or use Find in document.
- Template values: shows when the document has a template layout. It has one field for each text in the layout’s cover, headers and footers. Type a replacement, or leave the field empty to keep the layout’s text. Remove a text with Remove from the template on its row. Text that you change less often is under Other text.
- Sources: lists the sources that the document cites.
Header buttons

- Tags: shows the knowledge tags that the document draws from. A project document inherits its tags from the project, and shows the text N from project.
- Comments: opens the comments on the document.
- Versions: shows earlier versions.
- Share: share the document with other users.
- Export: export the document to Word, PDF, Markdown or Google Docs.
- Options menu: contains Duplicate document, Save as template and Delete this document. In a project document, it also contains Approve document.
Images and screenshots
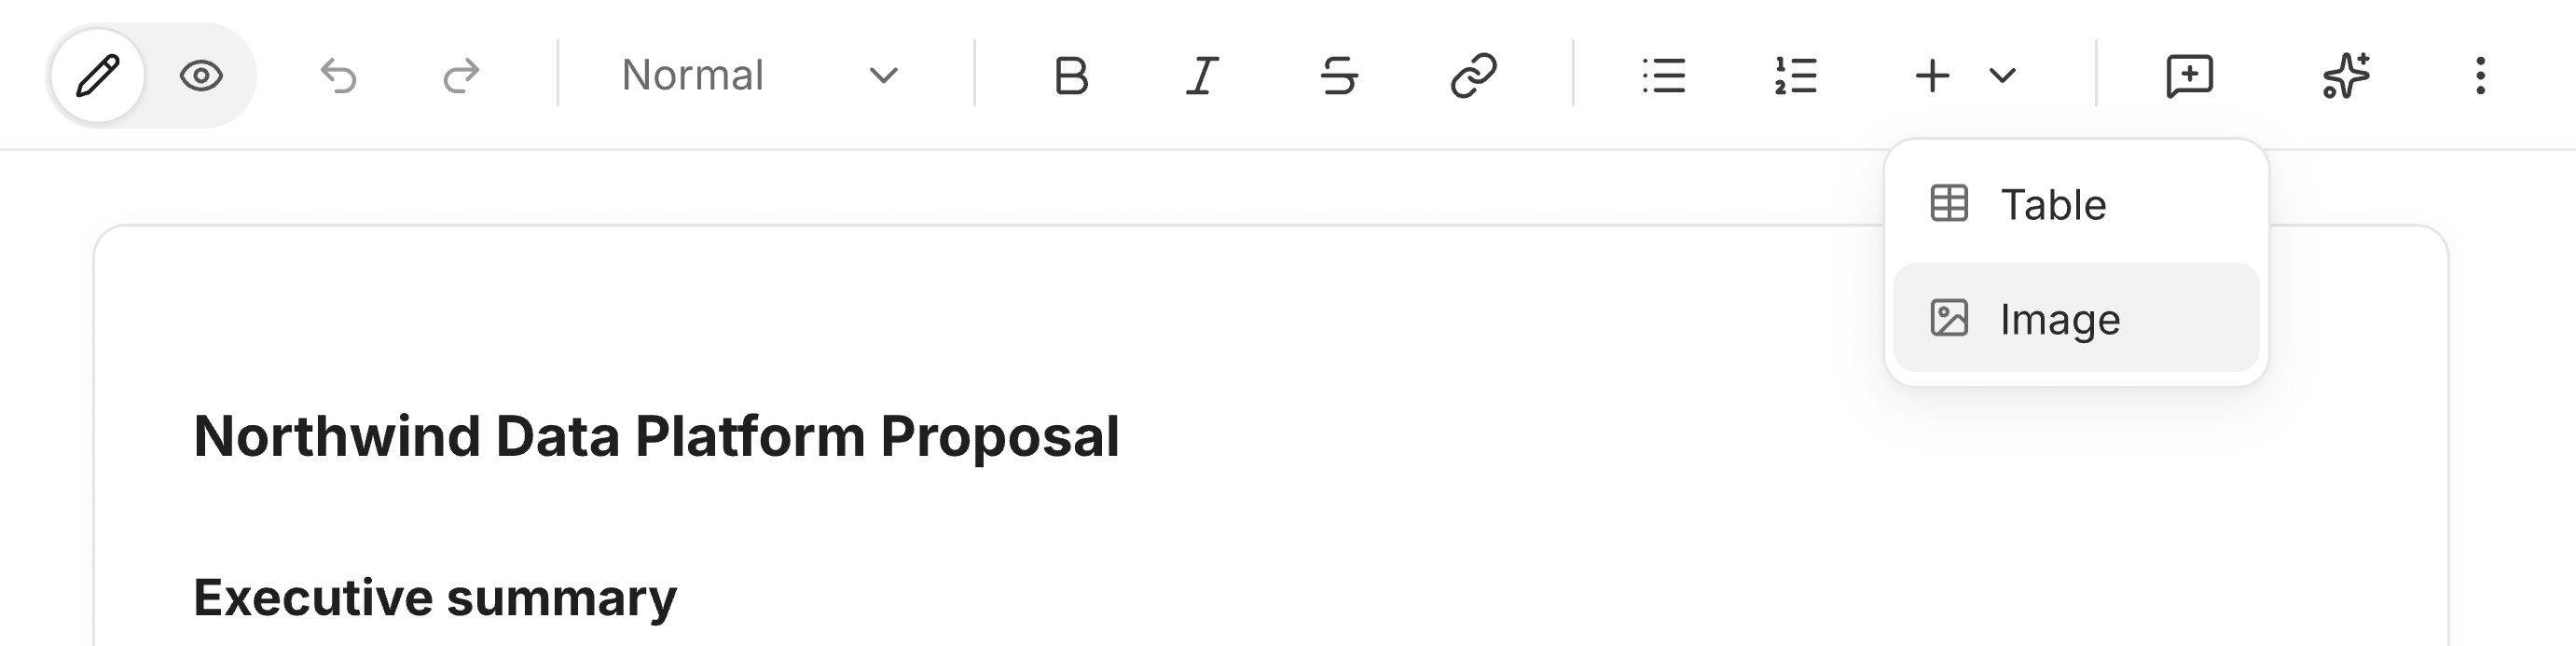
You can put images, such as diagrams and screenshots, in a document. Realm supports PNG, JPEG, GIF and WebP images.Add images
- Click in the text where the image goes.
- Paste the image, or drag one or more image files into the document.
- Or click + in the toolbar and choose Image. You can select more than one image. The images appear at the cursor in file order.
- Click an image to select it. Drag a corner to change the size. The image keeps its proportions, and Word exports keep the size that you set.
- Use the buttons on the selected image to copy the image, copy its link or delete it.
Place images with the chat
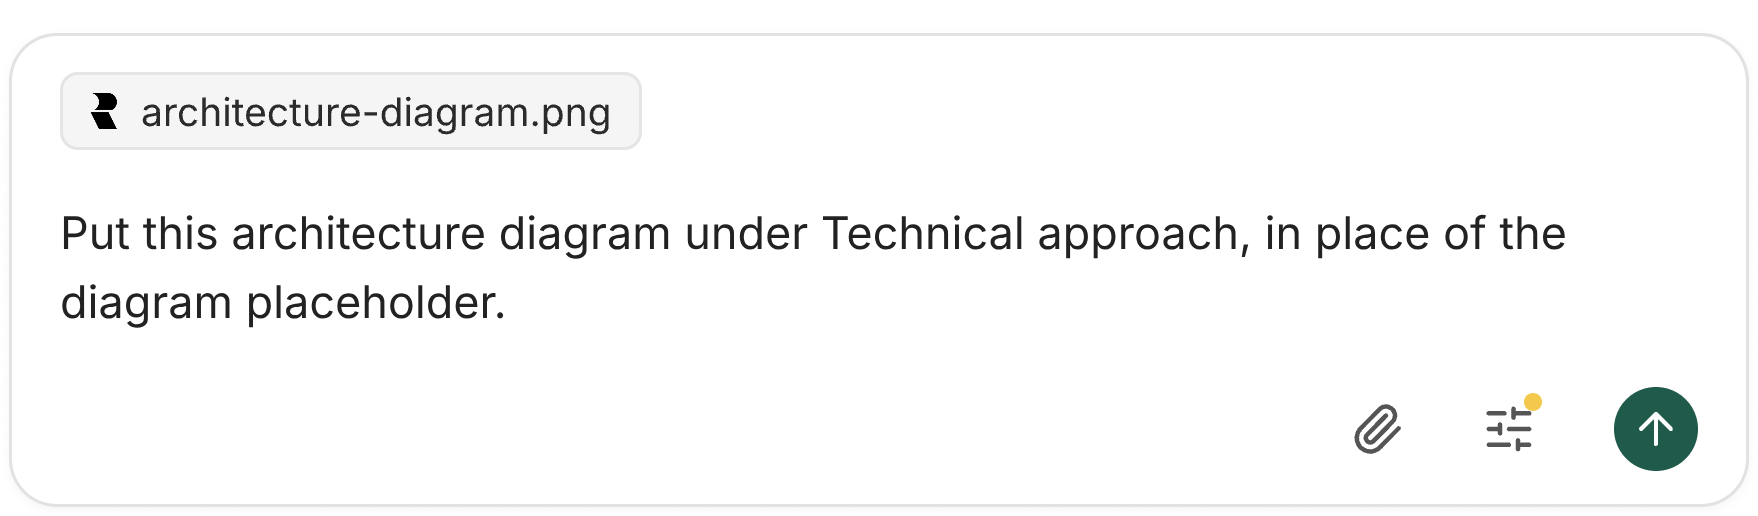
- Click the paperclip in the chat in the editor and attach the image.
- Tell Realm where the image goes, for example “Put this architecture diagram under Technical approach”.
- Send the request. Realm puts a copy of the image at that position.
Add screenshots to questionnaire answers
- Open the questionnaire and find the Attachments column.
- Point at the cell of the row and click +. The attachment picker opens.
- Choose a document from the list, or click Upload from computer to add a screenshot. The cell shows the name of the attachment.
Pictures in templates
A template made from a Word file keeps the pictures of the file, such as a logo, in the same position. Realm keeps PNG, JPEG and WebP pictures. Other picture formats, such as EMF drawings, show as their description.Review and approve
Your team can review each section, add comments, and approve each section.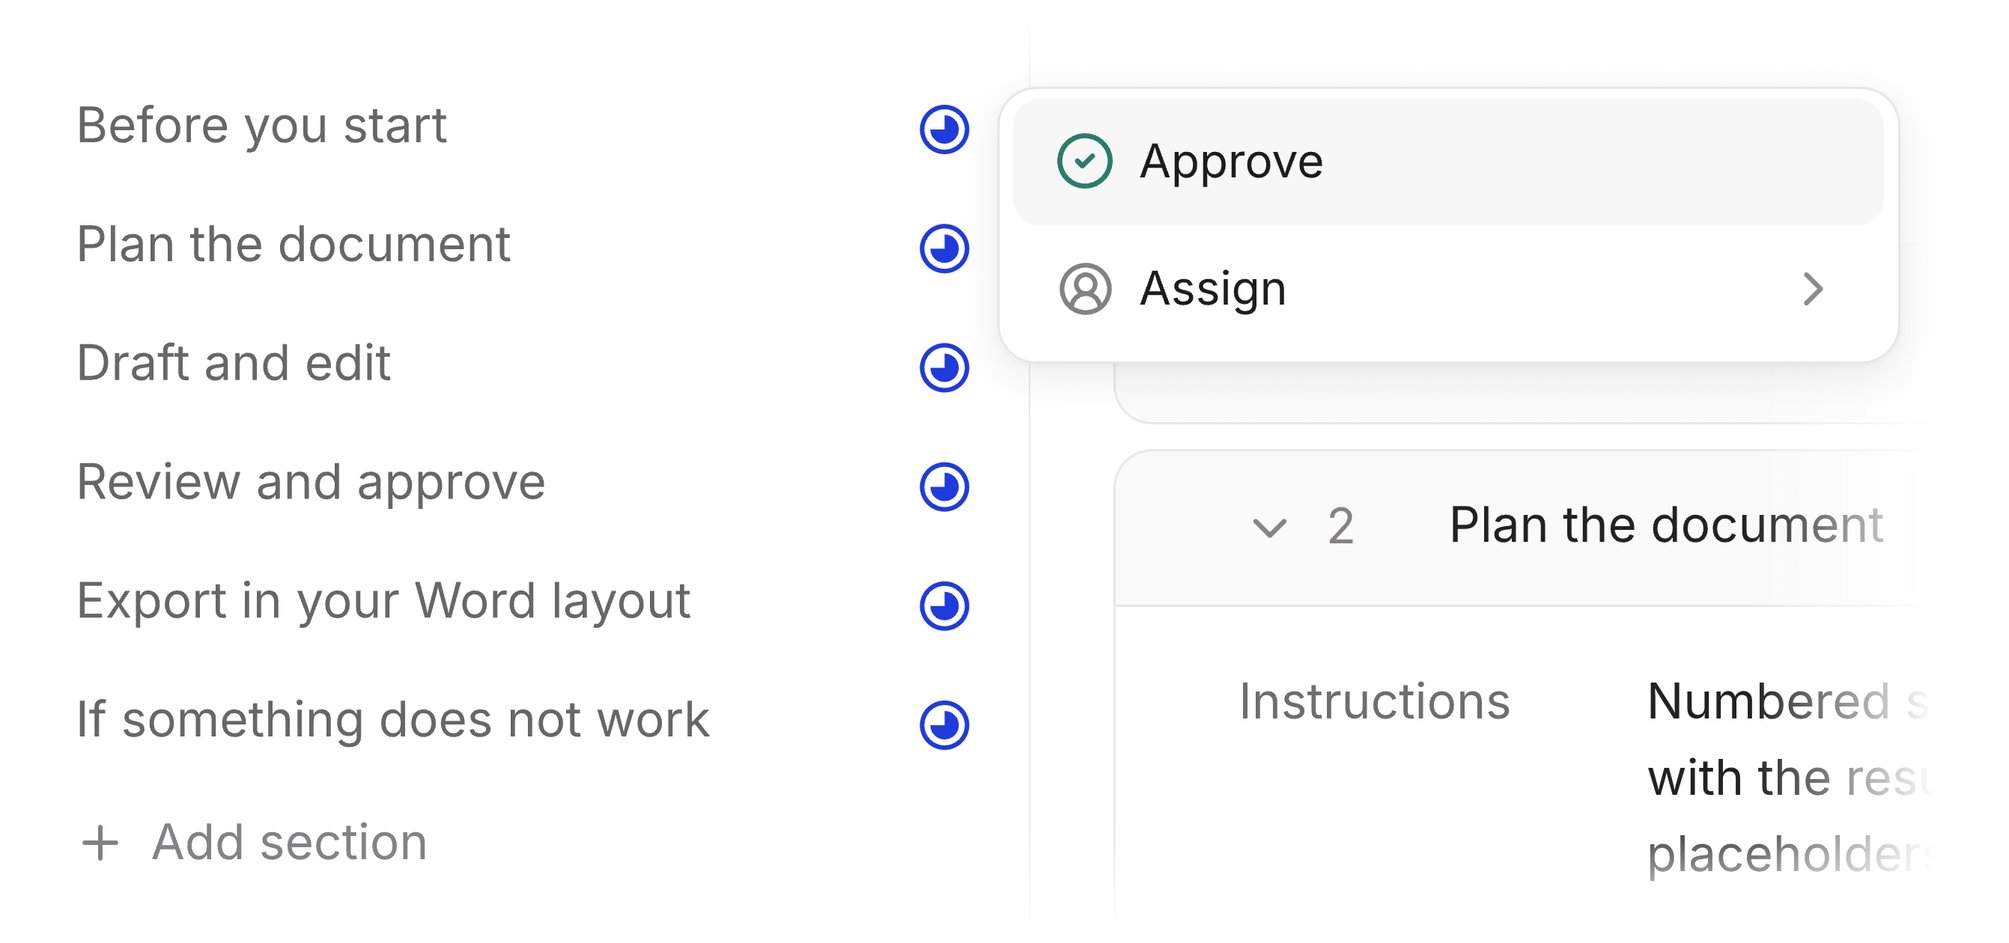
- Select the text that you want to comment on, then add a comment. The comment stays attached to the selected text.
- Type @ and the name of a teammate in the comment to assign it to that person. A comment on an approved section puts the section back in review.
- Open the Outline tab. Each section shows a status icon.
- Click the status icon of a section. You see the options Approve or Unapprove, Assign, and N unresolved comments, where N is the number of open comments on that section.
- Choose the option that you need. Choose Assign to give the section to a teammate. Choose N unresolved comments to read the open comments.
- Choose Approve for a section that has open comments. Realm asks you to Resolve and approve.
- Choose Resolve and approve. Realm resolves the open comments and approves the section.
- In a project document, choose Approve document in the options menu of the document when your team agrees with all of it. Realm approves every section.
- Open the My tasks view. You see the sections and comments that are assigned to you.
Export in your template layout
Export the approved document in your own template layout. An admin can set a default template layout. If your document has no template layout of its own, Preview and the Word, PDF and Google Docs exports use the template layout of the default template.- Choose Preview. You see the document in its template layout.
- Choose Export. The export panel opens.
- Select Word, PDF, Markdown or Google Docs. The panel shows the options for this format.
- For Word, PDF and Google Docs, use Match formatting of to select the template layout. The list shows the saved templates of your organization and Standard Realm style.
- Choose Use as document template. The document keeps this layout.
- Complete the export. You get the finished file in the format that you selected.
- Regenerating an approved section puts it back in review.
- Press Ctrl+Z to undo a paragraph rewrite.
- Choose Versions to see earlier versions. An export of an earlier version uses that version.
- Realm never sends the document to anyone.
Templates and tags
Templates are saved documents that you can start new documents from. To open the Document Templates page, click Templates on the Documents page, or click Browse all templates in the + menu.Add a template
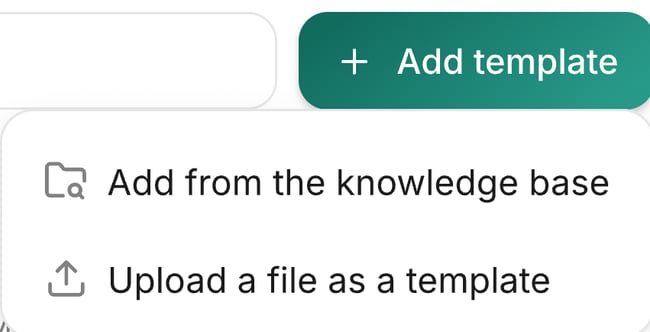
- Open the Document Templates page and click Add template.
- Choose Add from the knowledge base or Upload a file as a template. A Word file keeps its layout in the template.
Manage a template
- Point at a template and click Show to preview it.
- Open the row menu and click Use template to start a new document from the template.
- Open the row menu to Rename or Delete the template.
Save a document as a template
- Open the options menu of the document and click Save as template. Realm copies the document into a template.
- To undo this, click Remove from templates.
Give a template tags
- Open the template and click its tag button.
- Choose the tags for the template. A document that you start from the template outside a project gets those tags. When a new document has tags that match a template, that template is listed first under Suggested.
Add a template layout to a skill
- Open the skill and click Add property.
- Choose Template. The skill can carry a template layout. See Properties.
Set the organization default template
An admin sets the default template in Organization settings, under Document template. See Document template. For more on templates and tags, see Templates and Knowledge tags.If something does not work
Find the problem that you see in the list below. Then do the action that is next to it.- A section stays on Writing. Open the Plan tab and click the regenerate button for that section. If the section was approved, it goes back to review.
- The layout looks wrong. In Match formatting of, choose Standard Realm style or a different template. Look at the result in Preview.
- You have a different problem. Report it to the Realm team.
- Write the name of the document and the name of the section.
- Write what you did and what you saw.
- Send the report to support@withrealm.com.